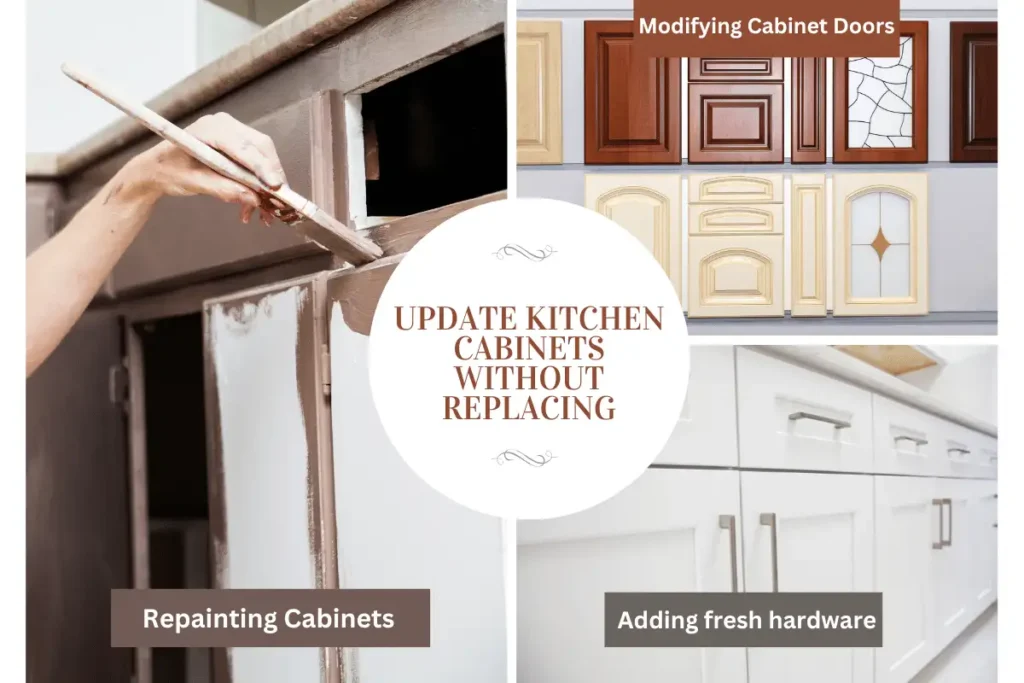
Do you want to update kitchen cabinets without replacing them? Does your kitchen exist at another time? You’re not alone. Though they worry about the cost and effort involved in changing all the cabinets, many people prefer a modern, attractive kitchen. The wonderful news is that you don’t have to take out your cabinets to make your kitchen seem different. Making some wise adjustments may help your room seem nicer without having to spend a lot of money.
Using reasonably priced ideas that will significantly impact you, this tutorial will walk you through updating your kitchen cabinets without altering them. Whether you enjoy do-it-yourself tasks or recently bought a house, these ideas will help you update your kitchen.
We will go through these here:
- The most reasonably priced approach to remodeling your kitchen is to repaint your cabinets.
- Changing cabinet doors and drawer fronts is a more reasonably priced option than overhauling everything.
- Adding fresh hardware is one easy and reasonably priced approach to make a significant difference.
- Fun ideas for texture and style are using contact paper or peel-and-stick wallpaper.
- Adding molding or trim looks nice without having to pay the hefty price.
- Which cabinet refacing or cabinet replacement better fits you?
By the end of this book, you will have all the tools and ideas needed to change your kitchen cabinets without the hassle of a complete redesign. Let us start now.
Table of Contents
Update kitchen cabinets by Repainting them with a fresh color
Why Repainting Turns Everything Around?
Repainting your cabinets is one of the cheapest and most efficient approaches to modernizing your kitchen. A fresh paint job can make existing cabinets seem brand-new and alter the appearance and feel of your home. Whether your preferred design is modern or a warm, rustic vibe, paint helps you personalize your kitchen to match it.
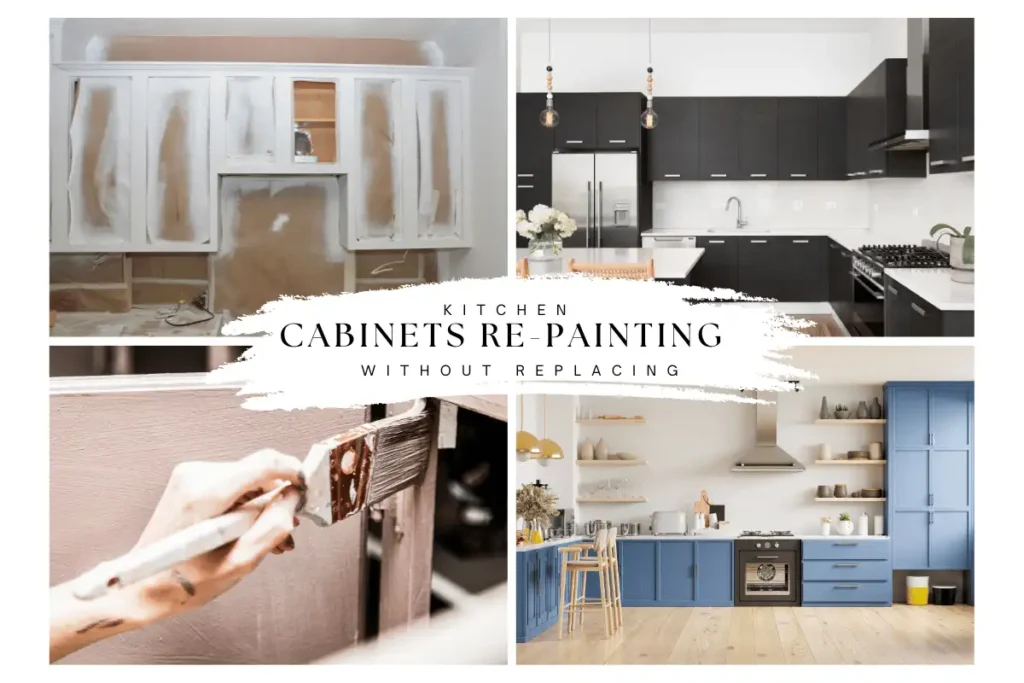
Benefits of updating kitchen cabinets by Repainting them:
- Repainting expenses are a small portion of rebuilding drawers.
- Any color or finish will help you match your kitchen’s style.
- Most occupations allow one to finish over the weekend.
Selecting the Perfect Paint for Kitchen Cabinetry
Not all paints are the same, particularly for kitchen cabinets. The best selections are summarized here:
- Satin Finish or Semi-Gloss Finish:
- Kitchens would find these finishes ideal as they are robust, easy to maintain, and water-resistant.
- Perfect for contemporary or traditional kitchens.
- Paint Chalk:
- Chalk paint creates a matte, aged look and requires little preparation.
- Perfect for farmhouses or rustic kitchens.
- Paint Made with Acrylic Latex:
- This paint dries quickly, smells little, and produces a smooth, even finish.
- Best For: Do-it-yourselfers seeking a professional finish.
- Paint Using an Oil Base:
- Oil-based paint has a smooth, durable surface and is very robust.
- Ideal for busy kitchens; be aware it smells strongly and dries more slowly.
Tip: you may also consider Mississippi Delta-Inspired Paint Colors by Sherwin-Williams while selecting the color to update kitchen cabinets.
Methodical Guide on Repainting and to update kitchen Cabinets
Are you ready to launch this project? Use these guidelines to get precisely what you want:
- Remove the Hardware and the Cabinet Doors:
- Remove all cabinet doors, drawers, and hardware, including hinges, pulls, and knobs.
- Label every door and box with painter’s tape. This will enable a simple reconstruction of everything.
- Clean the Surfaces:
- Unmistakable fingerprints, grime, and grease using a cleanser.
- Verify the surfaces’ total dryness.
- Dust the Cabinets:
- To remove the old finish and smooth up the surfaces for the fresh paint, carefully sand them.
- Dust may be removed using a moist cloth.
- Apply Primer:
- Make sure the paint stays well and flows naturally by starting with a decent foundation.
- Follow manufacturer instructions for the primer’s drying schedule.
- Describe the Cabinets:
- Paint thin, uniform layers with a brush or roller.
- Before laying on the next layer, let each one completely dry.
- For total coating, most cabinets call for two or three coats.
- Rejoin the Cabinets:
- Revers the doors, drawers, and hinges after the paint fully dries.
Typical Errors to Avoid during update kitchen cabinets
- Skipping Prep Work: A long-lasting finish depends critically on cleaning and sanding.
- Using the Wrong Paint: May make cleaning difficult; avoid flat or matte paints.
- Do Not Hurry the Procedure: To prevent lines or bubbles, let every spray dry completely.
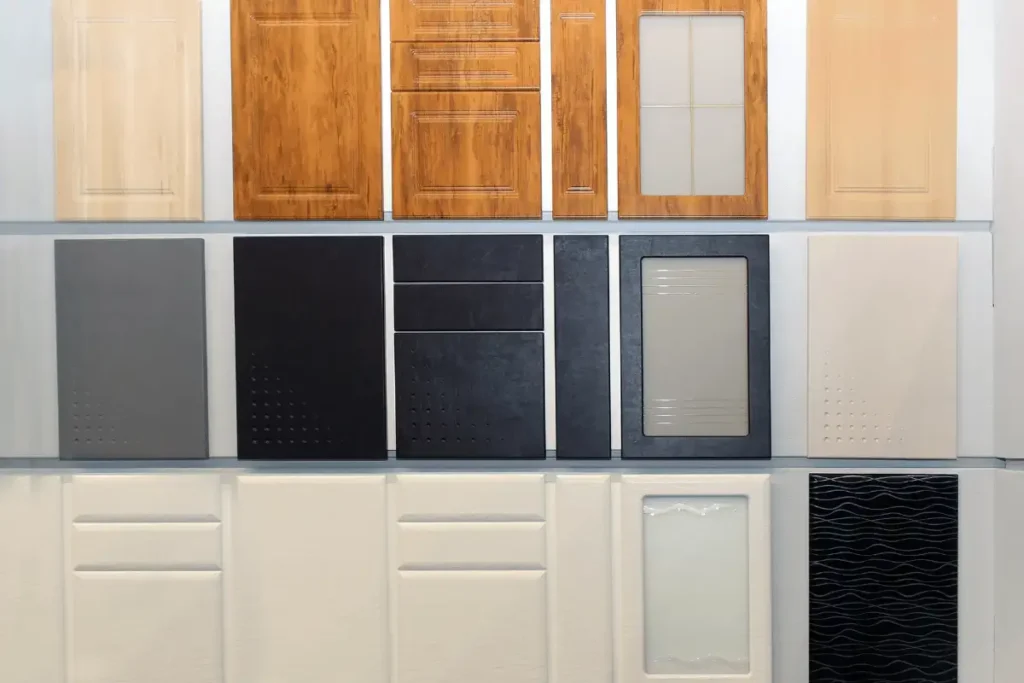
Modifying Drawer Fronts and Cabinet Doors
Why Would You Change Drawer Fronts and Cabinet Doors?
Replacing just those components is a wise and reasonably priced solution if your cabinet boxes are in good repair, but the doors and drawer fronts seem aged. This approach modernizes the look of your kitchen without the expense and work involved in changing all the cabinets.
Advantages of Varying Door and Drawer Front Designs:
- Changing just the doors and drawer fronts is far less costly than overhauling the cabinet.
- Pick fresh materials, colors, and designs that complement the decor of your kitchen.
- Using the existing closet bins helps reduce trash.
How to Choose Correct Drawer Fronts and Doors?
Consider these factors while selecting fresh door and drawer front designs:
- Material:
- Wood: Flexible and robust are wood doors. To match your style, paint or stain them.
- MDF (Medium-Density Fiberboard): Affordable with a smooth surface and simple painting.
- Glass: Fantastic for highlighting your meals and adding elegance.
- Mode:
- Shaker: A timeless look appropriate for both contemporary and antique kitchens.
- Slab: Excellent for contemporary designs; sleek and understated.
- Raised Panel: Gives depth and substance, which is ideal for traditional or country-style kitchens.
- Finish:
- Painted: Choose any hue that complements the colors of your kitchen.
- Stained: Highlights the inherent patterns of the wood for a cozy, organic look.
- Laminated Materials: Have many textures and forms, ranging from simple hues to wood grain.
Cost Comparison: Do It Yourself Against Professional Installation
You can change cabinet doors and drawer fronts or pay someone else. The expenses are broken out here:
| Option | Average Cost |
| DIY | 50–150 per door |
| Professional | 200–500 per door |
DIY Installation:
- Pros: Cost savings, customizing ability, and finishing pace you might like.
- Cons: You require basic knowledge of woodworking equipment like a drill, screwdriver, and level.
Professional Arrangement:
- Pros: Time saved, a flawless outcome guaranteed, and less possibility of mistakes.
- Cons: It might need booking and is more costly.
A Methodical Guide for Changing Cabinet Doors
Here is what to do if you choose to work on your own:
- Measure Your Present Doors’ Dimensions:
- Find the height, breadth, and thickness of your current door fronts and box fronts.
- Review the figures again to be sure the new doors will fit properly.
- Order Drawer Fronting and New Doors:
- Get handcrafted doors from a cabinet vendor or ready-made doors from a home improvement store.
- Choose hardware fit for your new doors, including hinges, knobs, and pulls.
- Remove Drawer Frontings and Old Doors:
- Remove the screws securing the old doors and drawer fronts in place using a tool.
- Mark every door and box to facilitate the process of returning items.
- Replace Drawer Fronts and Doors:
- Attach the replacement doors and drawer fronts with either current screws or new ones, depending on need.
- Check everything for straightness with a level.
- Replace Hardware:
- Finish the look with pulls or knobs.
Notable Door Styles to Consider for update kitchen cabinets
- Shaker Doors: Simple and timeless, shaker doors feature a flat central panel and square borders.
- Glass-Front Doors: Accentuate your preferred cups or dishes and add flair.
- Slab Doors: For kitchens of today, simple, contemporary slab doors are excellent.
- Beadboard Doors: A rural or farmhouse-style kitchen might find beadboard doors excellent. They provide characters with vertical lines.
Adding Additional Hardware to Update Kitchen Cabinets
Why Should Hardware Be Important?
Though small, cabinet hardware may significantly change the appearance and functionality of your kitchen. Consider it your kitchen’s jewelry—it provides the last detail to bind everything together.
Advantages of Hardware Upgrades:
- New knobs or handles may give ancient cabinets a modern and fresh appearance.
- Easy-to-grip handles and soft-close hinges help you to utilize your kitchen.
- One of the most reasonably priced fixes you can do is change your hardware.
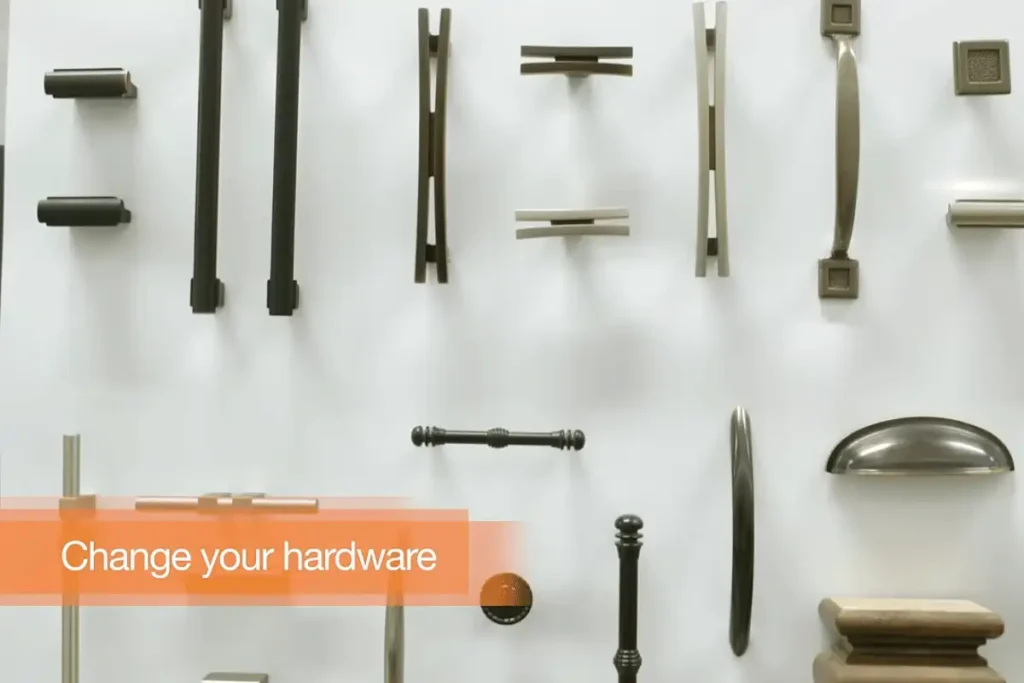
How to Choose the Correct Hardware to update kitchen cabinets
Consider these factors while selecting new instruments:
- Styles:
- Modern: Under finishes like brushed silver or matte black, simple and fashionable designs.
- Traditional: In materials like antique brass or oil-rubbed bronze, ornate knobs, or cup pulls.
- Rustic: Old-fashioned or worn-out designs.
- Ultimately:
- Ensure the finish complements the other appliances in your kitchen—such as taps, lighting, or tools.
- Standard finishes include brushed nickel, chrome, brass, and matte black.
- Objectives:
- Because they are more straightforward to grip, get larger knobs for drawers and closets.
- For compact drawers and cabinet doors, use handles.
- Scale:
- Check that your drawers and your gear size line up. Small drawers can find giant handles too much, and small locks on large cabinets appear strange.
Comprehensive Guide on New Hardware Installation
Changing cabinet hardware is a simple do-it-yourself project that will take a few hours. Here is the way to go:
- Sort Your Tools:
- Use a Phillips or straight, depending on your screws, for a screwdriver.
- If you have to create new holes, use a drill.
- A measuring tool.
- A template (to maintain consistent hole placement).
- Get Rid of Outdated Tools:
- Remove the screws binding the old knobs or pulls in place using a tool.
- Try gently wiggling the hardware to free it if it is caught.
- Measure and Note the Locations of Future Holes:
- Should you be going from knobs to pulls—or vice versa—you could have to create new holes.
- Mark the precise sites for the new hardware using a template. This preserves all cabinets exactly.
- If You Must, Drill Fresh Holes:
- Make use of a drill bit matching your new screws in scale.
- Drill gently to stop the wood from cracking.
- Join New Hardware:
- Using the holes, line the new buttons or handles.
- Stuck in the screws, use a screwdriver to tighten them. Make sure you don’t pull too much; else, you can harm the equipment or peel the screws.
- Inspect the Hardware:
- Open and close the drawers or cabinets to ensure the hardware is securely and functionally sound.
Advice for a Cohesive Appearance
- Keep to the same design and finish in your kitchen for a consistent look.
- Get creative with cabinet doors using knobs and drawers using pulls to get a distinctive look.
- Make sure the finish you chose for soft-close hinges matches your new hardware.
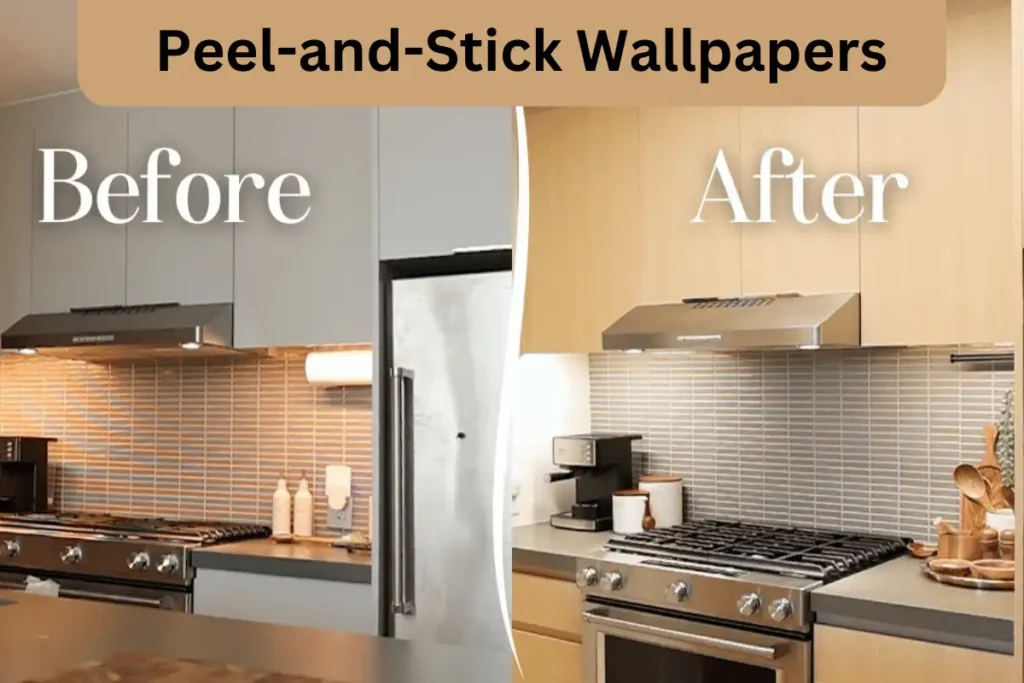
Applying Contact Paper or Peel-and-Stick Wall Covering
Peel-and-Stick Materials: Changing the Rules
For families wishing to accentuate their cabinets with color, patterns, or texture, peel-and-stick wallpaper and contact paper are excellent choices. Less permanent than paint, they are also less expensive than cabinet replacement. Perfect for renters or anybody who loves to alter their décor often, these inexpensive, basic materials can be removed without damaging your cabinets.
Peel-and-Stick Materials: Benefits
- Affordable: Purchasing new cabinet doors will cost more than a roll of contact paper or peel-and-stick wallpaper.
- Just Peel, Stick, and Smooth: No particular equipment or talents are required.
- Perfect for Renters or Anybody Who Enjoys Often Changing Their Look.
- Versatile: Like marble and wood grain, versatile forms, hues, and textures abound here.
Thoughts on updating kitchen Cabinets
These creative ideas can help you remodel your cabinets with peel-and-stick products:
- Marble Look:
- Use marble-pattern contact paper to give your worktops or cabinet doors a sophisticated, elegant look.
- Wooden Grain:
- If you enjoy a rural or farmhouse style, utilize wood-grain contact paper to bring warmth and color into your kitchen.
- Geometric Patterns:
- For a modern and striking style, use brilliant, geometric wallpaper.
- Accident Cabinets:
- The two-tone appearance results from top or bottom cabinets covered in peel-and-stick materials.
- Interior Cabinets:
- When you open your cabinets, put patterned wallpaper inside them for a whimsical delight.
Detailed Guide on Using Peel-and-Stick Materials
Are you game to try it? Use these guidelines to apply perfectly:
- Tidy the Surfaces:
- Use a cleanser to wipe fingerprints, oil, and filth from your cabinet doors and drawers.
- Verify the surfaces’ dryness entirely.
- Measure and Cut from There:
- Calculate the area you wish to cover, then cut the peel-and-stick material to the appropriate scale, adding a little more for cutting later.
- Peel and Stick Method:
- Pull the backing gently, then align the material with your cabinet’s edge.
- As you work, remove any bubbles or wrinkles with a squeegee or credit card.
- Cut the Edges:
- Cut any superfluous bits at the margins using a pocket knife or scissors.
- Seal the Edges (Optional):
- Cover the material’s sides with a transparent sealant or Mod Podge to increase durability.
Peel-and-Stick Materials: Benefits and Drawbacks
Advantages:
- Affordable and straightforward for usage.
- Your cabinets remain the same.
- Infinite choices for style.
Conspectus:
- It might not hold the same lifetime as modern doors or paint.
- Using it on uneven grounds might be challenging.
- Not appropriate near the sink or in locations high in moisture.
Success Guide
- Start Tiny: If you are first experimenting with peel-and-stick materials, start with a tiny area, perhaps one cabinet or drawer front.
- Look for Readily Adjustable, Thick, Sturdy Wallpaper or Contact Paper for Your Project.
- Take Your Time: To avoid bubbles and get a smooth finish.
You may interested to read also: best kitchen remodeling ideas 2025
Installing Mold or Trim to Update Kitchen Cabinets
Why Do Trim and Mold Matter?
Like the last adjustments on a well-fitting garment, molding and trim provide your cabinets with a clean, fashionable, and distinctive appearance. Whether your desired design is vintage or sleek modern, molding and trim can transform your kitchen cabinets from basic to spectacular.
Benefits of Either Adding Molding or Trim:
- Custom Look: Molding gives your cabinets a deeper, more distinctive look, indicating their specially created nature.
- Affordable: Compared to replacing cabinets, adding molding is a cheap approach to makeover your kitchen.
- Versatile: From essential to elegant, versatile designs allow any design look to be complimented.
Many Forms of Molding and Cutting
Here are some well-known decisions you should consider:
- Crown Molded:
- Crown molding is placed atop them to give your cabinets more height and appeal.
- Perfect for contemporary or classic kitchens.
- Light Rail Molding:
- Placed beneath cabinets to cover the under-cabinet lights.
- Improves usability and presents everything.
- Ornamental Panels:
- Applied on cabinet sides or fronts to create a paneled look.
- Fantastic for increasing complexity and visual appeal.
- Baseboard Molding:
- Arranged at the bottom of cabinets to provide a seamless floor and cabinet appearance.
- Ideal for a homogeneous and clean look.
Methodical Guide for Installer of Molding or Trim to update kitchen cabinets
As a do-it-yourself project one weekend, you might quickly add molding or trim to your cabinets. This is how you should go forward:
- Gathering Your Instruments:
- A measuring tape.
- Miter saw for angled cutting plastic.
- For mounting casing, use a nail gun or adhesive.
- Wood glue and sandpaper for the last details.
- Measure and Cut:
- Calculate the areas you wish to feature trim.
- Cut the trim to the correct size using a miter saw to ensure accurate and tidy corners.
- Enter the Molding:
- For a permanent fix, fasten the trim to your drawers with a nail gun.
- If you want anything that may be removed later, use strong glue, such as double-sided tape or construction adhesives.
- Fill and Sand in Mind:
- Seal any gaps or nail holes with wood filler.
- Smooth the filled regions with sand.
- Stain or Paint:
- For consistency, paint or stain the trim to match your cabinets.
Doing It Yourself (DIY) versus Hiring a Professional for update kitchen cabinets
DIY:
- Benefits: Cost savings, customizing ability, and finishing pace you might like.
- Cons: Requests some essential tools and construction knowledge.
Expert:
- Savings in Time and a Flawless Finish Are Benefits.
- Cons: It might need booking and is more costly.
Comparison of Cost:
- DIY:
- 50–
- 50–100 for materials.
Tip: You can use Kitchen Remodeling cost calculator to estimate pricing.
Professional:
- 200–
- 200–500, depending on the complexity of the project.
Advice for a Presentable Appearance
- Match the look of your kitchen by selecting molding that fits it overall.
- Paint or stain: Make sure the trim complements your cabinets for a unified appearance.
- Start Small: If you’ve never worked in carpentry, start with a simple project like installing crown molding on top of your cabinets.
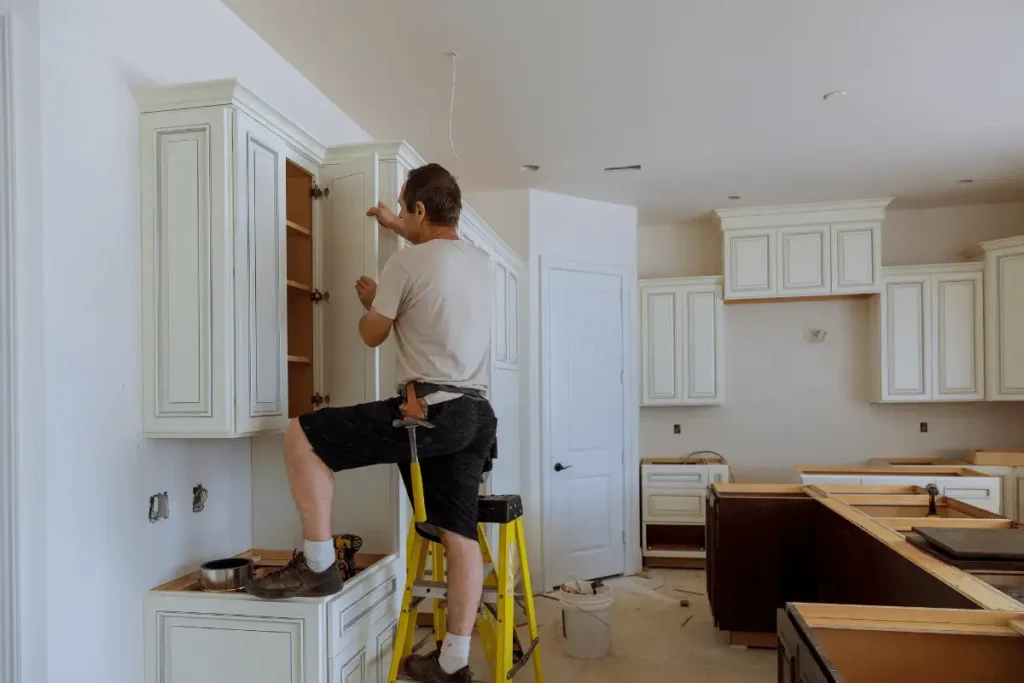
Refacing Cabinets vs Cabinet Replacement – update kitchen cabinets
Cabinet Refining: What is it?
Cabinet refinishing is altering the exterior of your cabinets—that of the doors and drawer fronts—without replacing the original cabinet boxes. Typically, this procedure entails:
- Modifying the drawer fronts and doors to new ones.
- Coating or a thin layer is applied to the exterior of the closet box.
- Changing hardware includes doors, knobs, and pulls.
Advantages of Cabinet Refinishing:
- A reasonably affordable choice, refacing runs 50–70% less than purchasing new cabinets.
- It is less disruptive, as the closet boxes remain where they are; the procedure is quicker and cleaner than changing everything.
- Eco-friendly: Using the present closet boxes helps to reduce waste.
Drawbacks of Cabinet Refacing:
- Your drawers’ form or size cannot be changed significantly.
- The present cabinet boxes must be in good condition if upgrading is to be successful.
Describes Cabinet Replacement Here.
Replacing cabinets is removing your old ones and installing new ones. This option lets you completely alter your kitchen layout, use fresh materials, and personalize every last element.
Benefits of Cabinet Replacement:
- Customizing allows you to choose new materials, designs, and styles that meet your needs.
- New cabinets are guaranteed and sturdy.
- Changing your cabinets will significantly raise the value of your house upon sale.
The Drawbacks of Changing Cabinets Are:
- 2–3 times more costly than refinishing is a replacement.
- Depending on the size of the work, the procedure might last several weeks.
- Your kitchen is not going to be helpful during business.
Comparing Costs: Refacing Instead of Replacing
The average costs for every alternative are compiled here:
| Option | Average Cost |
| Cabinet Reflecting | 4,000–9,000 |
| Replace Cabinet | 8,000–15,000+ |
Factors Affecting Costs:
- Bigger kitchens need more effort and materials.
- Using premium materials like unique treatments or solid wood will drive expenses.
- Hiring experts for suitable raises the overall expenses.
When Should One Decide on Cabinet Refinancing?
If you want cabinet refinishing but:
- Your closet bins are really in decent condition.
- You appreciate your proposed cooking schedule.
- You seek quick task completion and financial savings.
When Should We Replace the Cabinets?
If your cabinets need updating, consider:
- Your present cabinets are either poorly built, old-fashioned, or damaged.
- You wish to add soft-close drawers or pull-out shelves or alter the appearance.
- You want your kitchen to seem elegant and pricey and intend to renovate it.
Do-It-Yourself Versus Professional Installation
Refacing a Cabinet:
- For experienced do-it-yourselfers, this is possible; nevertheless, it requires specific tools and careful labor.
- Professional: I advised most homes to get the ideal outcome.
Changing Cabinets:
- DIY: Not suggested unless your woodworking is exquisite.
- Professional: Crucially crucial for proper placement and setup.
Guideline for Making the Greatest Choice
- Figure out how much you wish to spend, and then follow that figure.
- Refacing is a fantastic choice if your cabinet boxes still look decent.
- Consider your goals: Do you want a comprehensive makeover or a simple update?
- Get various quotes: Before deciding which company to choose, consider costs and offerings from numerous others.
Expert Advice for Economical Cabinet Improvements
Review of the Most Economical Approaches
You may upgrade your kitchen shelves without going broke. The least expensive approaches we have covered are briefly summarized here:
- Changing Cabinets: Repainting
- Paint and supplies cost between
- 100and
- 100and300.
- Impact: A fresh coat of paint may completely transform your cabinets.
- Changing Cabinet Doors and Drawer Fronts:
- DIY costs
- 50–150 for each door; professional costs
- 200–500 per door.
- Effect: It cleans the look of your drawers without replacing them entirely.
- Building New Hardware:
- Prices:
- 2–25 each.
- Effect: Quick modifications to your shelves’ appearance and functionality are made.
- Using Contact Paper or Peel-and-Stick Wallpaper:
- Cost:
- 20–50 for each roll.
- It adds color, pattern, or structure for far less money than paint or repair.
- Applying Molding or Trim:
- Cost:
- 50–100 (DIY) or
- 200–500 (professional).
- Effect: Provides a fashionable, costly look without paying the related expenses.
Typical Errors To Avoid
If not attentive, little upgrades might lead to issues. These are some mistakes to be wary of:
- Ignoring Work on Preparation:
- Sand and clean surfaces always before applying glue or paint. Ignoring this stage could lead to poor bonding and an ugly look.
- Selecting the Correct Resources:
- Not every glue or paint is suitable for cabinets. Use robust, water-resistant products designed for a hectic environment.
- Ignoring Functionfulness:
- Don’t sacrifice value for appearance. Select tools that are suitable for use and made of easily cleaned materials.
- Neglecting the Whole Picture:
- Make sure your modifications fit the overall style of your kitchen. For a country-style kitchen, new equipment might not fit quite.
Final Action Plan for Do-It-Yourself Remodelers
Are you prepared to replace your kitchen cabinets? Apply this detailed step-by-step action plan:
- Look into Your Cabinets:
- Examine your drawers and decide what has to be changed or improved.
- Prepare a Budget:
- Decide on your spending level and concentrate on improving the most crucial items.
- Choose Your Enhancements:
- Start with the most reasonably priced and efficient options, including redoing or purchasing fresh hardware.
- Get Your Equipment and Materials:
- Create a list of everything you need, including glue and paintbrushes.
- Slow Down:
- Hurrying could result in errors. Spend some time and be attentive to provide the most significant outcomes.
- Discover Your New Kitchen!
- Stop valuing what you have produced. You have modernized your kitchen without running significant expenses.
Last Words
You won’t have trouble or expenses replacing your kitchen cabinets. Your kitchen will appear better with thought and effort than with new cabinets. Small, reasonably priced adjustments like repainting, hardware replacement, or molding addition may significantly impact you.
Success is dependent primarily on preparation and readiness. Examine your cabinets, figure out your budget, then choose the alterations that best suit your taste and needs. Don’t hesitate to be creative; inexpensive effects may be produced using peel-and-stick wallpaper, adhesive molding, and other do-it-yourself projects.
Why are you waiting for? Get ready, pick your most significant upgrade, and improve today’s kitchen. Applying these ideas and techniques can help you design a beautiful, practical space you will love for many years.
Find more remodelingremodeling and renovation tips at the home advice.
I’m Amy Partridge, a Kitchen Designer with over 8 years of experience in bespoke kitchen design. As the editor and author for The Home Advice’s kitchen remodeling content, I strive to provide accurate and actionable insights. This content is for general guidance only—always consult a certified expert for personalized solutions. For inquiries, visit our Contact Us page.