If you’re anything like me, you love a good home upgrade—especially one that doesn’t break the bank. A kitchen backsplash is one of those details that can completely transform your space. It protects your walls from splashes and stains, sure, but it also adds so much personality. The problem? Traditional tile backsplashes can be pricey, and hiring a pro to install them? Even more expensive.
That’s where DIY kitchen backsplash ideas come in. With a little creativity (and some elbow grease), you can get a high-end look for a fraction of the cost. Over the years, I’ve tried everything from peel-and-stick tiles to painted designs, and let me tell you—some of these budget-friendly options look just as good as the real deal.
In this guide, I’ll walk you through some of the best, most affordable DIY Kitchen backsplash ideas, with real tips from my own experience. Whether you’re a homeowner looking to save money or a renter who needs something temporary, you’ll find plenty of inspiration here.
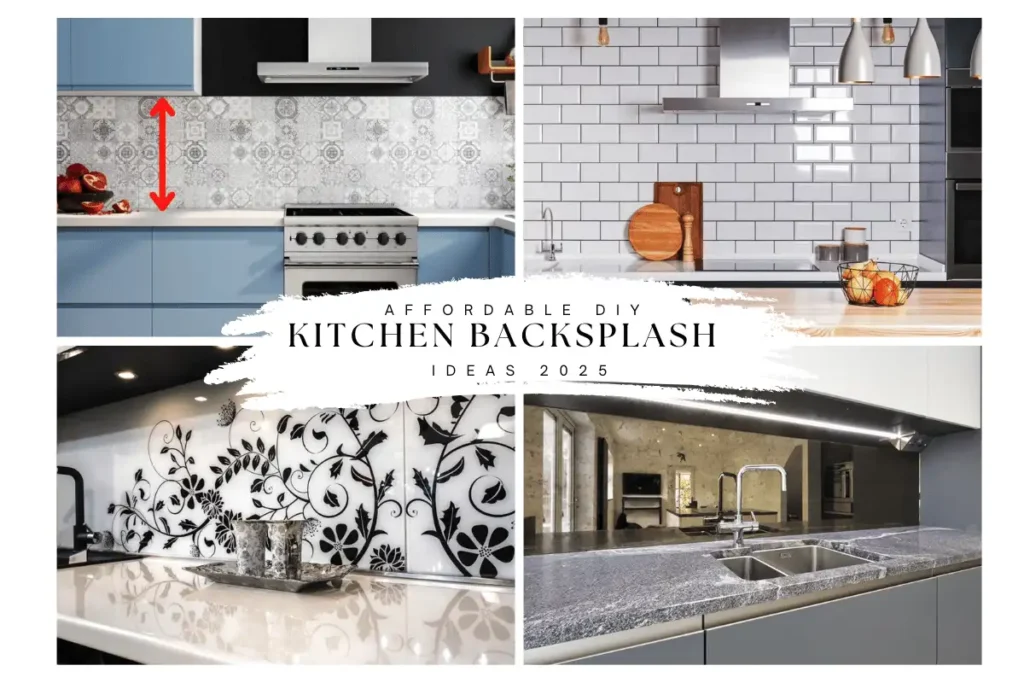
Table of Contents
Why DIY Kitchen Backsplash is a Smart Move
Before we jump into the ideas, let’s talk about why going the DIY route is a total game-changer.
1. You’ll Save a Ton of Money with DIY Kitchen Backsplash ideas💰
Hiring a contractor to install a backsplash can easily set you back anywhere from $800 to $2,500, depending on the materials and labor. Doing it yourself? You’re looking at $50 to $300—and sometimes even less. Here’s a quick price breakdown of some popular DIY options:
- Peel-and-stick tiles – $50–$150
- Beadboard panels – $100–$200
- Painted backsplash – $50–$100
- Reclaimed wood – $100–$250
Personally, I love peel-and-stick tiles for a quick upgrade, but if you’re on a super tight budget, painting your backsplash is hands down the cheapest way to go.
2. You Can Get Creative with DIY Kitchen Backsplash ideas 🎨
One of my favorite things about DIY projects is the freedom to make something unique. Store-bought backsplashes are nice, but they don’t always have that personal touch. When you DIY, you can:
✔ Pick colors and textures that match your vibe
✔ Experiment with different patterns (modern, farmhouse, vintage—you name it!)
✔ Even turn your backsplash into something functional, like a chalkboard wall for notes and meal plans
A friend of mine once used old wood planks from a discarded bookshelf to create a rustic backsplash—it looked like something out of a designer catalog.
3. It’s Easier Than You Think to DIY Kitchen Backsplash
Even if you’ve never done a DIY project before, I promise this is one you can handle. Some of these ideas, like peel-and-stick tiles or painted backsplashes, don’t require any special tools or skills. You can knock them out in an afternoon—and trust me, there’s nothing more satisfying than standing back and admiring your work.
4. Perfect for Renters
I know how frustrating it can be to want a stylish kitchen when you’re renting. Luckily, there are tons of removable and non-permanent backsplash options, like peel-and-stick tiles, foam panels, or even removable wallpaper. These upgrades can completely change the look of your space without violating your lease (or making your landlord mad).
Read Also: Top Kitchen Remodeling ideas trending in 2025
Best Budget-Friendly DIY Backsplash Ideas 2025
Alright, now let’s get to the good stuff—the best cheap and easy DIY backsplash ideas. I’ve either tried these myself or have friends who swear by them, so I know they work.
1. Peel-and-Stick Tile Backsplash (The Easiest & Most Popular)
💲 Cost: $50–$150
⏳ Time Required: 1–3 hours
🔨 Skill Level: Beginner
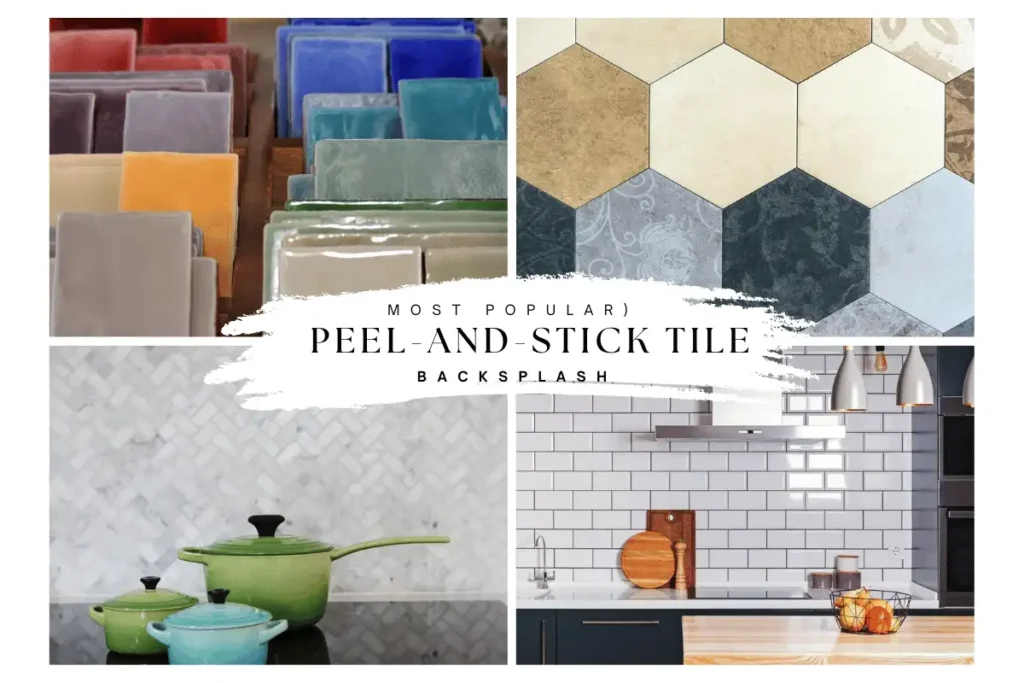
If you want an instant kitchen upgrade without the mess of grout and mortar, peel-and-stick tiles are your best bet. These things come in vinyl, metal, and even real stone finishes. I’ve used them in my own kitchen, and they hold up surprisingly well—even around the stove and sink.
How to Install:
- Clean the Wall – Make sure there’s no grease or dust. A simple wipe-down with dish soap and warm water works wonders.
- Measure & Cut – Use scissors or a utility knife to cut the tiles to fit.
- Peel & Stick – Remove the backing and press the tiles onto the wall.
- Trim the Edges – Use a ruler and a sharp knife for clean cuts.
Best for: Renters, budget-conscious homeowners, or anyone who wants a quick fix.
2. Painted Backsplash (The Most Affordable Option)
💲 Cost: $30–$100
⏳ Time Required: 3–5 hours
🔨 Skill Level: Beginner
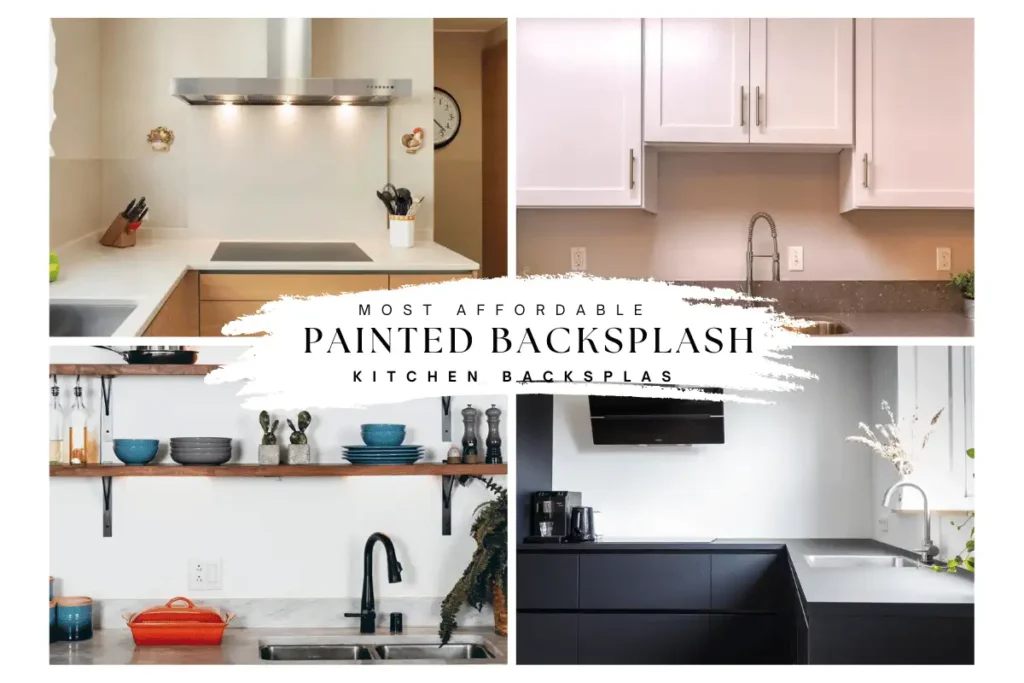
Want a fresh look but don’t want to mess with tile? Paint it! You can even use a stencil to create a faux tile pattern that looks like the real thing. I once painted a backsplash in a rental, and the best part? When I moved out, I just painted over it.
How to Do It:
- Prep the Wall – Clean and apply a primer so the paint sticks.
- Tape Off a Pattern – Use painter’s tape or a stencil to create a tile design.
- Paint the Base Coat – Let it dry completely.
- Add Details – Use a smaller brush to create faux grout lines.
- Seal It – A clear topcoat protects against moisture and grease.
Best for: Homeowners on a budget or renters who want an easy-to-repaint solution.
3. Beadboard Backsplash (Classic & Timeless)
💲 Cost: $100–$250
⏳ Time Required: 3–4 hours
🔨 Skill Level: Intermediate

If you love that farmhouse look, beadboard panels are a beautiful, budget-friendly alternative to tile. They’re super easy to install, and you can paint them any color you want.
How to Install:
- Measure & Cut – Use a saw to cut the panels.
- Attach to the Wall – Use nails or construction adhesive.
- Fill Seams & Gaps – Use caulk to make it seamless.
- Paint or Stain – Add a waterproof finish for durability.
Best for: DIYers who love the farmhouse, vintage, or classic kitchen aesthetic.
4. Faux Brick Backsplash (Rustic & Industrial)
💲 Cost: $100–$300
⏳ Time Required: 4–6 hours
🔨 Skill Level: Intermediate
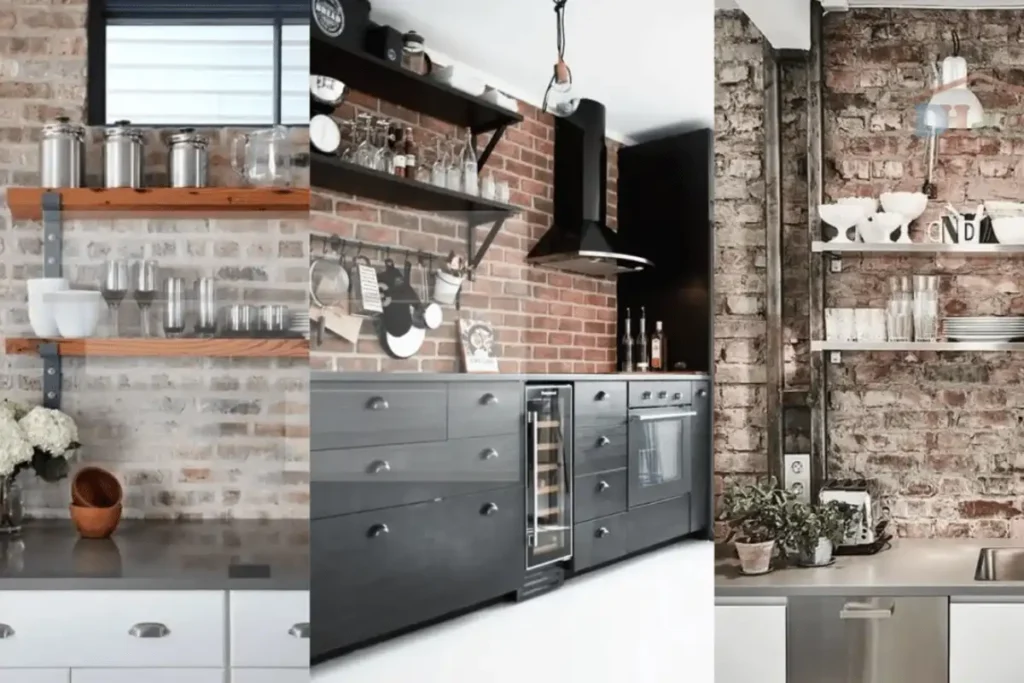
Love the look of an exposed brick kitchen? You don’t need to pay thousands for real bricks—you can get the same effect with faux brick panels or brick veneer. I’ve seen this done, and it looks stunning.
How to Install:
- Choose Your Material – Faux brick panels, wallpaper, or thin brick veneer.
- Cut Panels to Fit – Use a saw or scissors, depending on the material.
- Attach to the Wall – Use adhesive for panels or wallpaper paste.
- Seal & Paint – A clear sealant protects from grease and moisture.
Best for: Anyone who loves a rustic, industrial, or farmhouse vibe.
5. Reclaimed Wood or Pallet Backsplash (Eco-Friendly Option)
- 💲 Cost Estimate: $100–$250
- ⏳ Time Required: 5–7 hours
- 🔨 Difficulty Level: Advanced
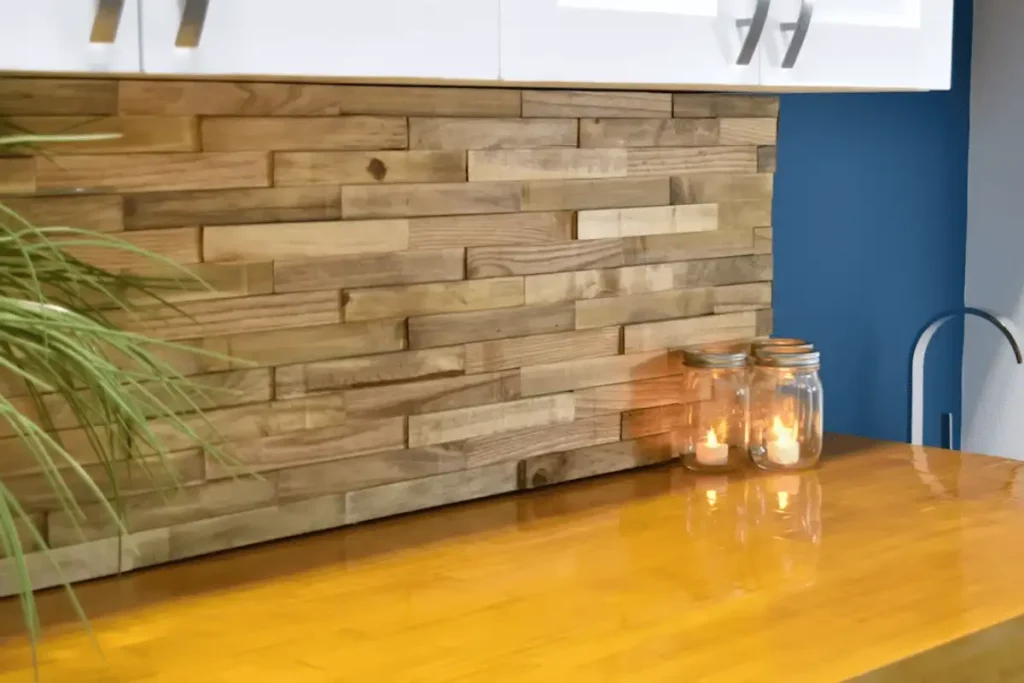
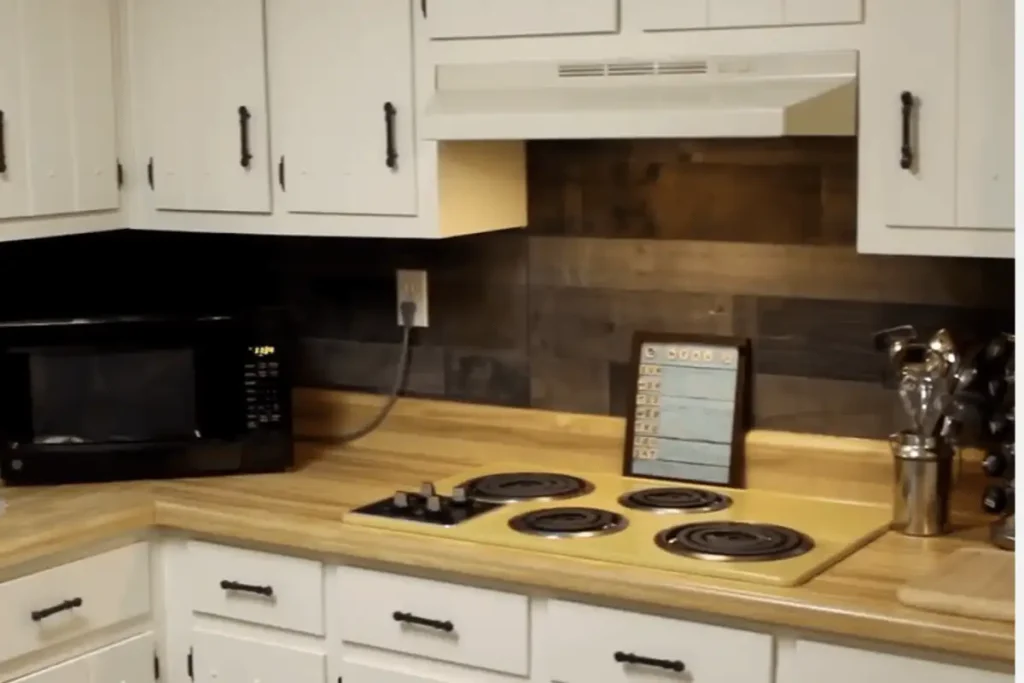
If you love natural textures and sustainability, using reclaimed wood planks or pallet wood for a backsplash creates a warm and inviting kitchen space.
Why It Works:
- ✔ Eco-friendly and repurposed material.
- ✔ Creates a one-of-a-kind rustic or farmhouse look.
- ✔ Works well with modern, industrial, or country kitchen designs.
How to Install:
- Source & Prepare Wood – Sand, stain, or paint the wood planks.
- Cut to Fit – Measure and trim boards to fit the backsplash area.
- Attach to Wall – Use construction adhesive or small nails.
- Seal & Protect – Apply a waterproof sealant to prevent moisture damage.
🔹 Best for: Homeowners looking for a unique, eco-conscious kitchen upgrade.
Tip: You can use our kitchen remodeling cost calculator for quick and accurate estimates.
My Step-by-Step DIY Backsplash Installation Guide
Okay, so now that you’ve got your backsplash idea in mind, let’s talk about actually getting it up on the wall. I’ve done a few of these myself, and trust me, having a clear plan makes all the difference.
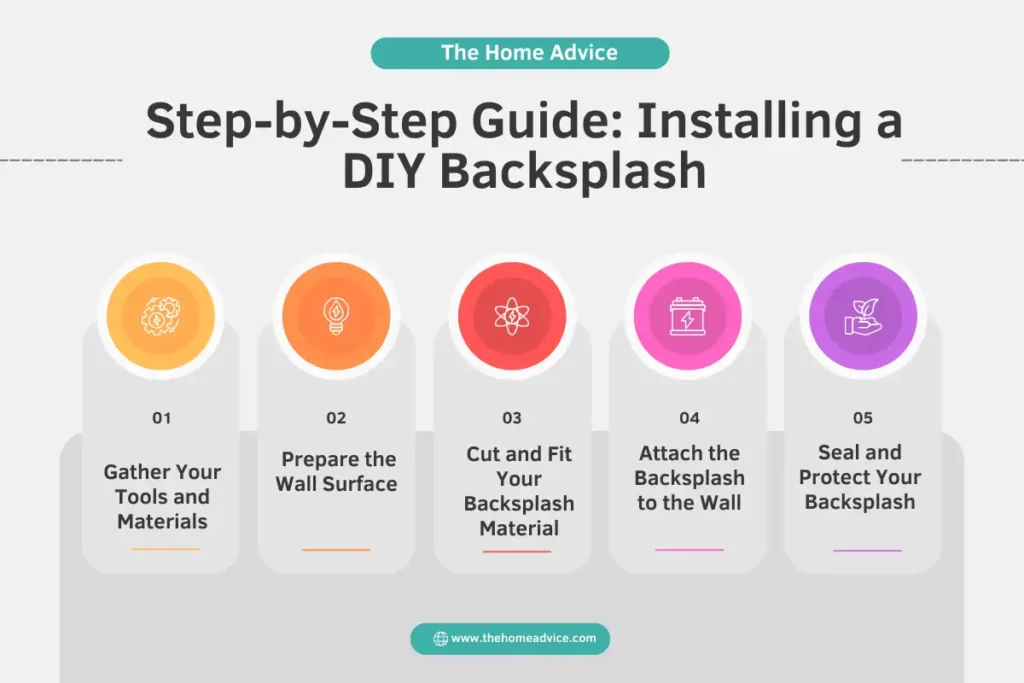
Step 1: Gather Your Tools and Materials
Nothing’s worse than starting a project and realizing you’re missing something crucial. Here’s what I always have on hand:
Essentials:
- Measuring tape
- Level (because uneven backsplashes are not the look we’re going for)
- Utility knife or scissors
- Strong adhesive (depends on your material)
- Caulk and a caulking gun
- Painter’s tape
- Sandpaper (if prepping wood or painting)
Specific to Your Material:
- Peel-and-stick tiles: A roller to make sure they really stick.
- Painted backsplash: Paint, primer, brushes, and stencils.
- Beadboard panels: A saw, nails, and wood filler.
- Faux brick panels: A saw and adhesive.
- Reclaimed wood: A saw and wood sealer.
Step 2: Prep the Wall (Don’t Skip This!)
I know, I know—prep work isn’t the fun part. But trust me, a smooth, clean surface makes all the difference.
- Clean It Up – Wipe down your wall with a degreaser or just warm, soapy water. Grease and dust will mess with adhesion.
- Fill in Gaps – If there are any holes or dents, spackle them up and sand smooth.
- Mark Your Layout – Grab a pencil and a level to make guide marks so you don’t end up with a crooked backsplash.
Pro Tip: If you’re installing over glossy tile, give it a light sanding so the new backsplash sticks better.
Step 3: Cut and Fit Your Backsplash Material
Every material needs a little finesse when it comes to cutting and fitting. Here’s what works best for each type:
Peel-and-Stick Tiles:
- Measure and cut the sheets using scissors or a utility knife.
- Dry-fit them first to make sure everything lines up.
Painted Backsplash:
- Use painter’s tape or a stencil to map out your design.
- Make sure the wall is primed and fully dry before painting.
Beadboard or Faux Brick Panels:
- A circular saw works best for cutting panels.
- Sand the edges before attaching for a clean, polished look.
Reclaimed Wood:
- Lay out your planks in a staggered pattern first—it looks more natural that way.
- Trim edges and sand them smooth before installation.
Pro Tip: Always leave a tiny gap around the edges for slight expansion due to temperature changes.
Step 4: Installation Time (The Fun Part!)
Here’s where everything comes together. Depending on the material, installation looks a little different.
Peel-and-Stick Tiles:
- Start at one end and slowly peel off the backing.
- Press each tile sheet firmly against the wall, smoothing out bubbles.
- Keep going, making sure each piece lines up perfectly.
- Trim the edges with a utility knife for a sharp finish.
Beadboard or Faux Brick Panels:
- Spread construction adhesive on the back of each panel.
- Press it into place, then secure with finishing nails.
- Fill any seams with caulk for a seamless look, then paint if needed.
Painted Backsplash:
- Prime the wall and let it dry completely.
- Use painter’s tape or a stencil to create a tile pattern.
- Paint in layers, letting each coat dry before adding details.
- Finish with a clear topcoat to seal everything in.
Reclaimed Wood:
- Apply liquid nails or wood glue to the back of each plank.
- Press them firmly against the wall, using small nails to keep them in place.
- Seal with a polyurethane coat to protect against moisture.
Pro Tip: Wipe off any excess adhesive right away to avoid a mess.
Step 5: Seal and Protect Your Work
To keep your backsplash looking fresh, a little sealing goes a long way.
- Peel-and-stick tiles: No sealing required, just wipe them down when needed.
- Painted backsplashes: A clear polyurethane coat will keep stains at bay.
- Beadboard or faux brick panels: Caulk the edges to prevent water damage.
- Reclaimed wood: A few coats of polyurethane will keep moisture out.
A DIY backsplash isn’t just about saving money—it’s about adding a personal touch to your home. The best part? Standing back at the end of the day, looking at what you just created with your own hands, and thinking, “Yeah, I did that.” Whether you go sleek and modern or rustic and textured, a backsplash is an easy way to breathe new life into your kitchen. If you’re even slightly considering it, I say go for it. You’ll be glad you did.
How to Keep Your DIY Backsplash Looking Great for Years
So, you put up a backsplash yourself—nice! That’s half the battle. But keeping it looking fresh? That’s what really matters. Trust me, I’ve learned the hard way that without the right upkeep, even the best DIY projects can start looking a little rough around the edges.
The good news? It doesn’t take much effort if you stay on top of it. Let’s go over the best ways to keep your backsplash clean, durable, and looking as good as new.
Everyday Cleaning: The Bare Minimum That Makes a Huge Difference
I know how easy it is to let grease, dust, and food splatters build up—especially if you cook a lot. But if you tackle it in small doses, you’ll save yourself from dealing with stubborn stains later.
- Daily Quick Wipe – A damp microfiber cloth does wonders. Just a few seconds keeps grime from setting in.
- Once-a-Week Deep Clean – A simple mix of dish soap and warm water usually does the trick. If I’m feeling fancy (or dealing with something extra greasy), I use a vinegar-water mix instead.
- Skip the Harsh Stuff – Anything too abrasive can scratch, peel, or fade certain surfaces. I learned this the hard way when I went a little too aggressive on a painted backsplash—big mistake.
A trick that’s saved me more than once? If something refuses to budge, a baking soda paste (just baking soda and a little water) works magic. Let it sit for a bit, then wipe clean.
Different Materials Need Different Care
Not all backsplashes are created equal. What works on tile won’t necessarily be great for painted surfaces or wood. Here’s what I’ve found works best for each type:
Peel-and-Stick Tiles
- Super easy to maintain, but you have to be careful with water.
- A soft sponge with warm, soapy water is enough for most messes.
- Avoid scrubbing near the edges—too much pressure can loosen the adhesive.
- If an edge starts lifting, I use a hairdryer to warm it up and press it back down. Works like a charm.
Painted Backsplash
- A damp cloth is your best friend—scrubbing too hard can chip the paint.
- Every 6–12 months, I add a new layer of sealant to keep stains at bay.
- Touch-ups are easy with a little matching paint, but blending it in takes patience.
Beadboard or Faux Brick Panels
- Dusting regularly prevents grime from settling into those little grooves.
- Wipe up spills fast—these materials don’t love moisture.
- A yearly coat of protective sealant makes all the difference.
Reclaimed Wood Backsplash
- Dusting with a soft cloth keeps it looking good.
- Too much water is the enemy. A slightly damp cloth is fine, but I never let water sit on it.
- Reapplying wood sealant once a year prevents warping—especially if your kitchen gets humid.
Something I swear by? If you have hard water stains (like I do near the sink), a little vinegar and baking soda mix takes care of it without damaging the surface.
How to Prevent the Most Common Backsplash Problems
Even with regular cleaning, certain issues pop up over time. The key is catching them early.
Grease Buildup
The longer it sits, the harder it is to remove. A quick wipe after cooking saves a ton of scrubbing later. If I forget (which happens more than I’d like to admit), a vinegar solution cuts through grease fast.
Peeling or Warping (Peel-and-Stick or Wood Backsplashes)
Heat and humidity are usually to blame. Making sure the backsplash is properly sealed helps, and if it’s near the stove, a range hood goes a long way in reducing heat exposure.
Mold & Mildew (Beadboard or Wood Panels)
Nobody wants to deal with this. Keeping moisture under control is key, which is why I always wipe down any spills right away. And if you haven’t sealed your backsplash yet—do it. It makes a huge difference.
Stains (Painted or Light-Colored Backsplashes)
Tomato sauce, coffee, oil—you name it, I’ve spilled it. A clear topcoat sealant helps prevent permanent stains, but quick cleanup is still the best defense.
Bonus tip: If your backsplash is close to the stove and you’re worried about heat damage, a removable protective film can be a lifesaver. It’s subtle, easy to clean, and saves you from dealing with discoloration over time.
When to Refresh or Replace Your Backsplash
Even if you’re meticulous about maintenance, backsplashes don’t last forever. If yours is starting to look worn out, a quick refresh can make a big difference.
- Peel-and-stick tiles peeling? Replace sections or swap them out entirely.
- Paint looking dull? A fresh coat of paint and sealant can bring it back to life.
- Wood warping or cracking? Sand it down, reseal it, or replace damaged boards.
- Want something new? Removable wallpaper or stencils are an easy way to mix things up without a big commitment.
I like to update my kitchen every so often without doing a full renovation. Sometimes, just changing the grout color, adding a pop of paint, or swapping out a few decor pieces makes the whole space feel brand new.
Budget-Friendly DIY Backsplash Ideas Worth Trying
If you’re thinking about upgrading but don’t want to spend a fortune, these ideas give you a lot of bang for your buck:
- Contact Paper Backsplash – Perfect for renters. I recommend a marble or subway tile print for a high-end look.
- Painted Faux Tile – If you have a steady hand (or a good stencil), this can look surprisingly real.
- Beadboard Paneling – Classic and easy to install. White or soft pastels give it that clean, airy feel.
- Faux Brick Panels – Adds great texture. If you want a modern touch, a whitewash effect looks great.
- Reclaimed Wood – Warm, natural, and full of character. Just be sure to seal it properly to avoid water damage.
Final Thoughts
A DIY backsplash is one of the easiest ways to level up your kitchen without spending a ton of money. But whether you’re maintaining what you’ve already got or thinking about a change, a little effort goes a long way in keeping it looking great.
The trick is staying ahead of the mess. Clean regularly, seal when needed, and if you start noticing wear and tear, take care of it before it gets worse. Trust me—it’s way easier to keep up with small fixes than to deal with major repairs down the line.
If you’re feeling inspired, go ahead and try one of the budget-friendly ideas above. A fresh backsplash can completely change the vibe of your kitchen, and it’s one of those DIY projects where the results are immediately satisfying.
find more Remodeling, Renovation and lighting and painting tips at the home advice
Author Disclaimer:
Amy Partridge here, a professional Kitchen Designer and the primary author for kitchen remodeling content on The Home Advice. With years of experience in bespoke kitchens, I aim to deliver reliable, practical advice. Please note, this content is for informational purposes only—consult a professional for tailored guidance. For more, visit our Contact Us page.