Introduction
Lighting for galley kitchens can be tricky. As galley kitchens—long, narrow, and often short on natural light. But with the right approach, you can turn that tight space into a bright, functional, and inviting cooking zone.
Good lighting isn’t just about seeing what you’re doing (though that’s key). It’s about creating a sense of openness and flow. Task lighting keeps your prep area sharp, while ambient lights soften the mood. And don’t overlook accent lighting—it’s the secret sauce for adding personality to even the most compact kitchen.
Whether you’re in a tiny apartment or a snug home kitchen, choosing best Lighting for galley kitchens can make all the difference. Bright, layered, and balanced—that’s the recipe for a galley kitchen that works as hard as you do.
In this comprehensive guide, we’ll explore the best lighting for galley kitchens, covering:
- Types of lighting (ambient, task, and accent)
- Best light fixtures and placement tips
- Energy-efficient and stylish lighting solutions
- Lighting tricks to make a narrow kitchen feel bigger and brighter
By the end of this article, you’ll have all the knowledge you need to transform your galley kitchen with strategic lighting that enhances both function and style.
Table of Contents
Types of Lighting for Galley Kitchens
A galley kitchen that’s well-lit isn’t just about tossing in a few bulbs—it’s about layering light like a pro. Think of it as a trio: ambient, task, and accent lighting. Each plays its part, working together to create a space that’s not only functional but also downright inviting. Lighting is also an important part of kitchen remodeling.
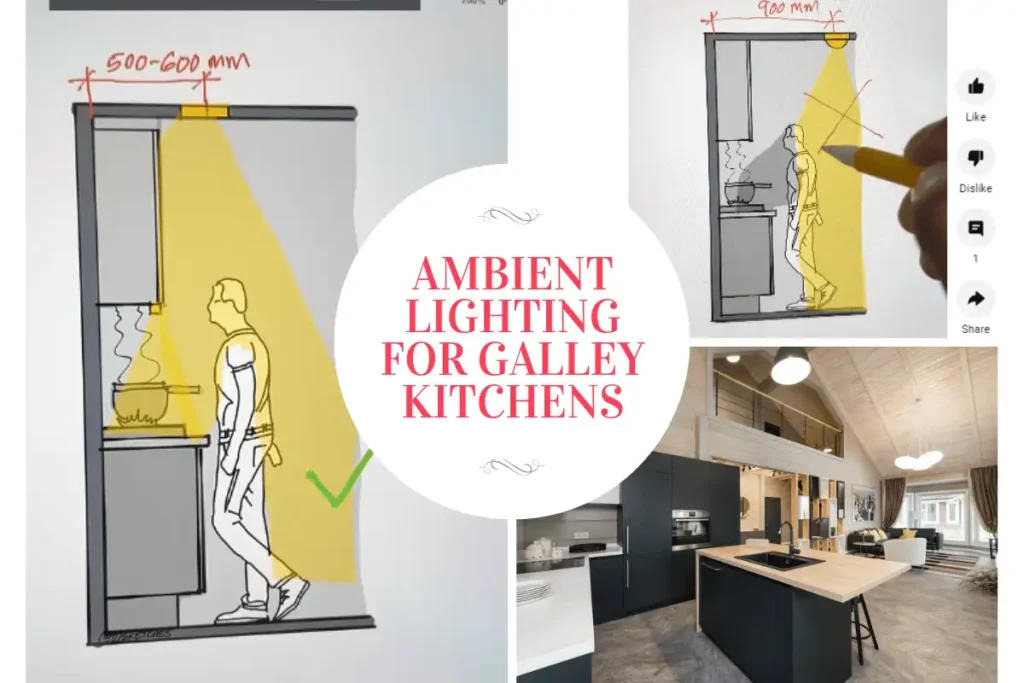
1. Ambient Lighting for Galley Kitchens
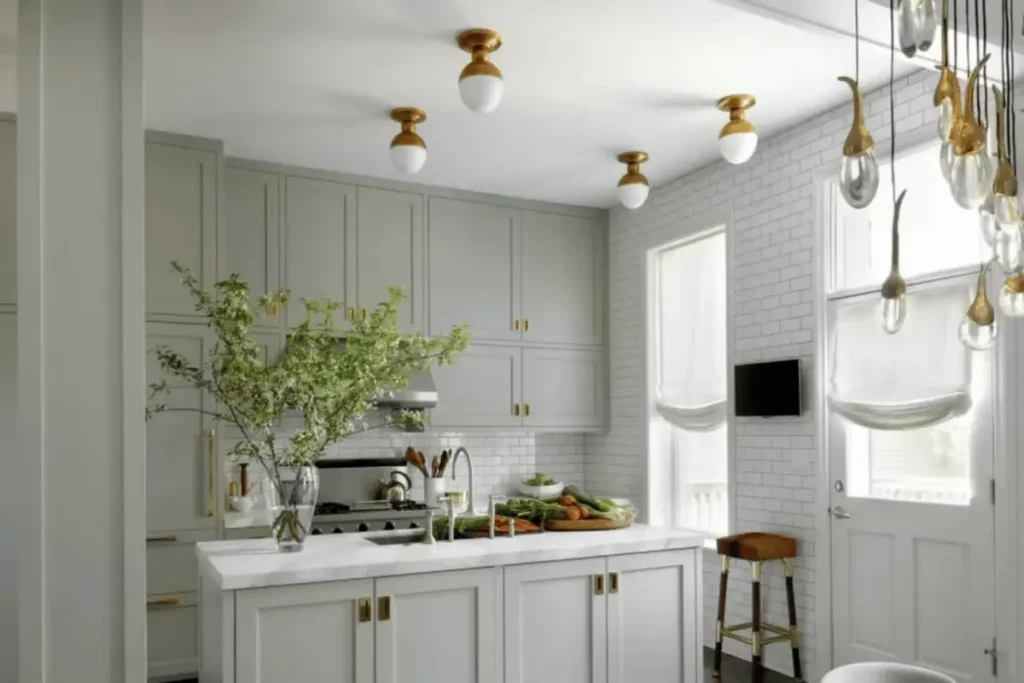
This is your kitchen’s main light source, the one that sets the stage. And let’s be real—galley kitchens often feel like they’re starved for natural light. That’s where strong, even overhead lighting comes in. It’s the backbone of your kitchen’s brightness, making sure no corner feels left in the dark.
Best Ambient Lighting for galley kitchen Options:
- Flush Mount or Semi-Flush Mount Ceiling Lights: Ideal for low ceilings, these fixtures provide broad and even illumination.
- Recessed Lighting (Can Lights): A sleek option that blends into the ceiling, preventing the space from feeling cluttered.
- LED Panel Lights: Energy-efficient and capable of mimicking natural daylight, making the kitchen feel more open.
Placement Tip:
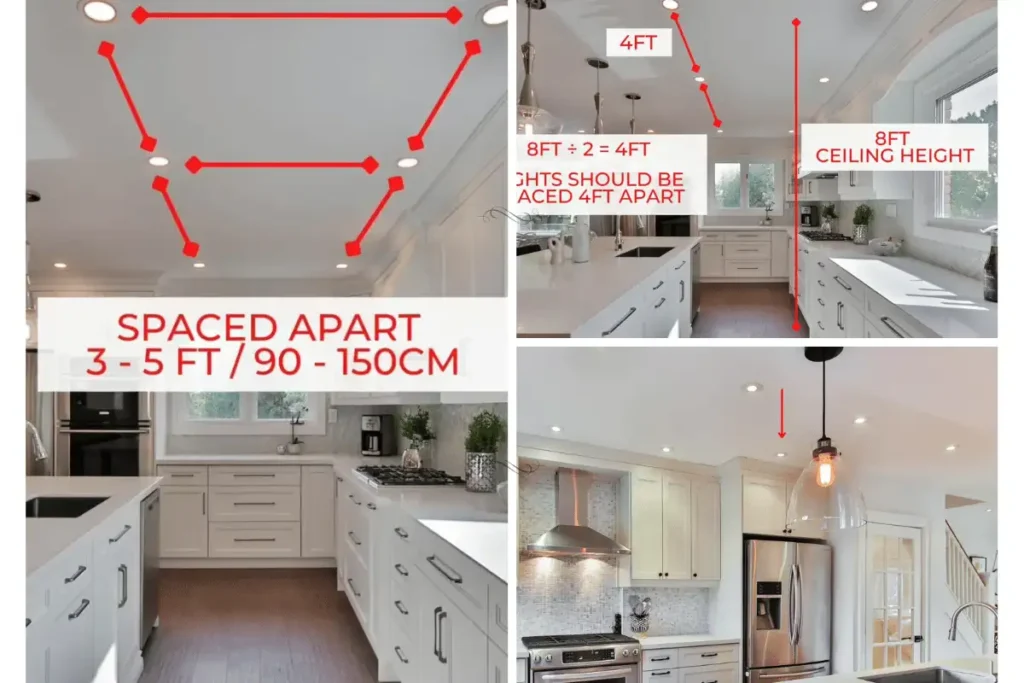
When it comes to ambient lighting, placement is everything. For recessed lights, space them out every 4 to 6 feet along the ceiling—no one wants weird dark patches ruining the vibe. If you’re going for flush mount lights, keep them centered along the galley to spread that glow evenly. Simple, right?
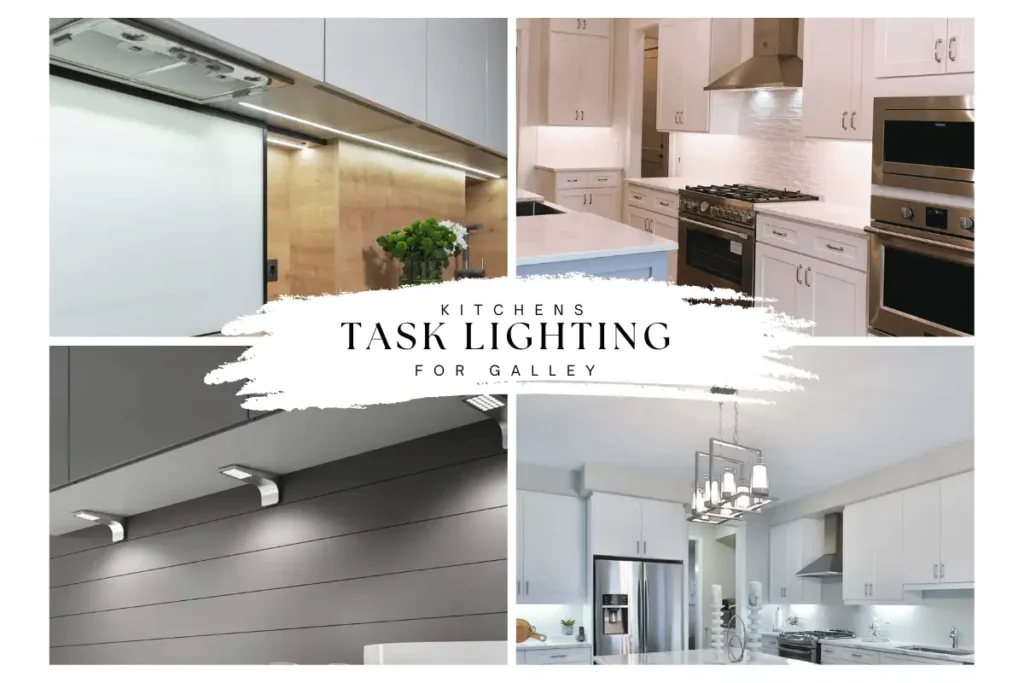
2. Task Lighting for Galley Kitchens
Now, let’s talk task lighting. Galley kitchens are all about efficiency, but those long countertops and tight workspaces need serious attention. Task lighting is your best friend here. Think under-cabinet lights to brighten up your food prep zones, or focused fixtures above the stove and sink. Because let’s face it—chopping onions in the dark is a recipe for disaster.
Best Task Lighting Options:
- Under-Cabinet LED Strips or Puck Lights: Directly light up countertops, making chopping and cooking safer.
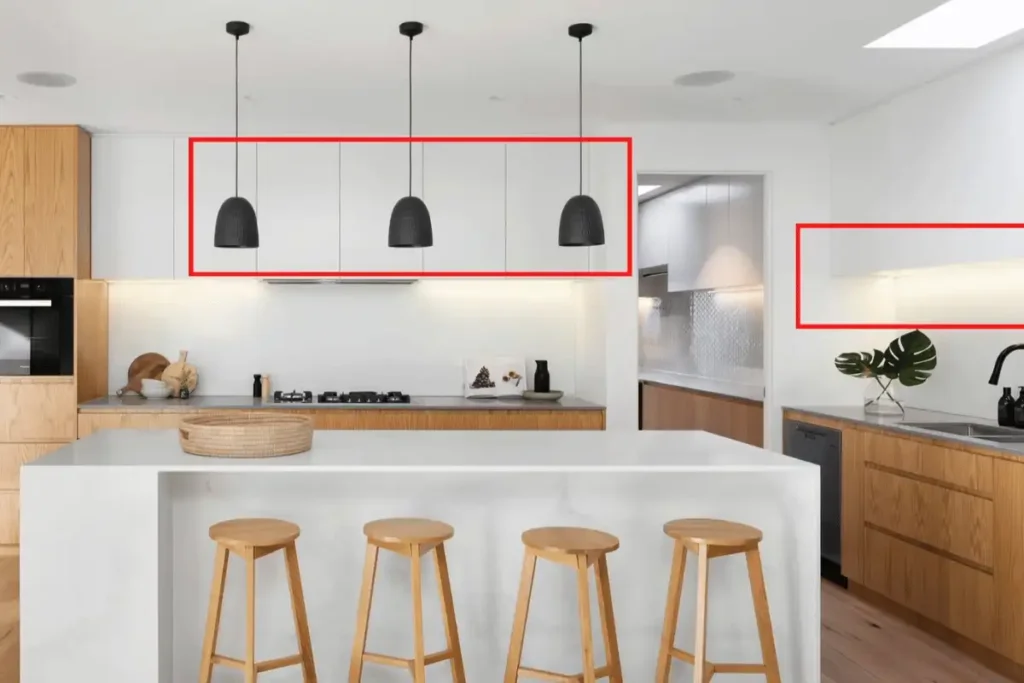
- Pendant Lights Over the Countertop: In open-concept galley kitchens, stylish pendants can enhance visibility and aesthetics.
- Track Lighting with Adjustable Heads: Flexible fixtures that can be aimed at key work areas for better functionality.
Placement Tip:
When it comes to under-cabinet lighting, placement is key. Install those lights toward the front edge of the cabinets—trust me, it makes all the difference. This way, you’ll banish those annoying shadows that love to creep over your workspace. No more squinting while you’re chopping veggies or reading recipes!
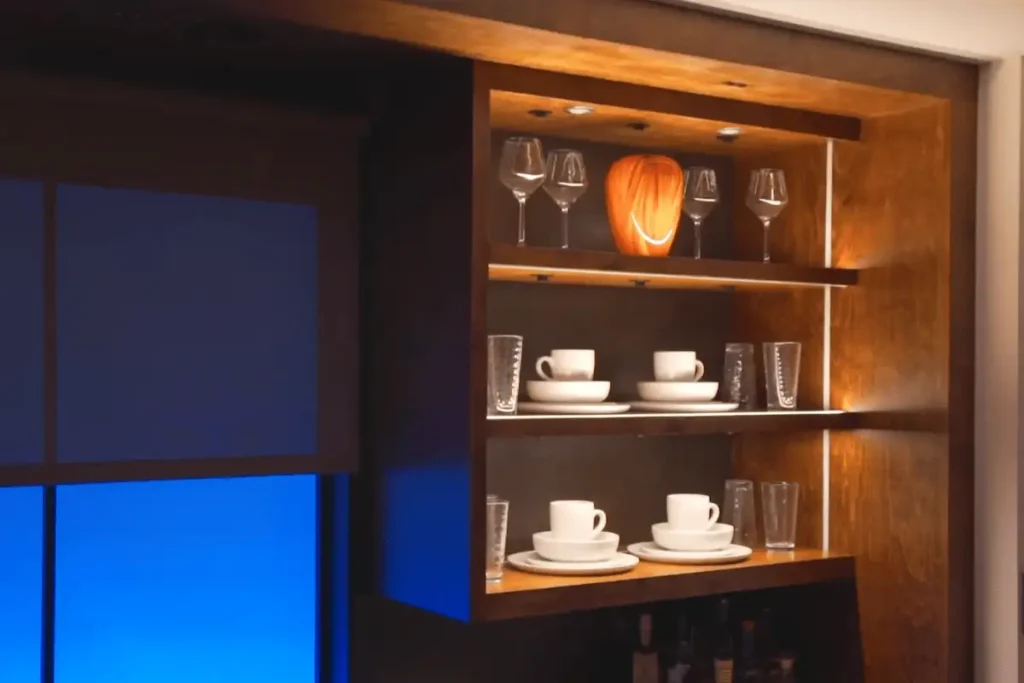
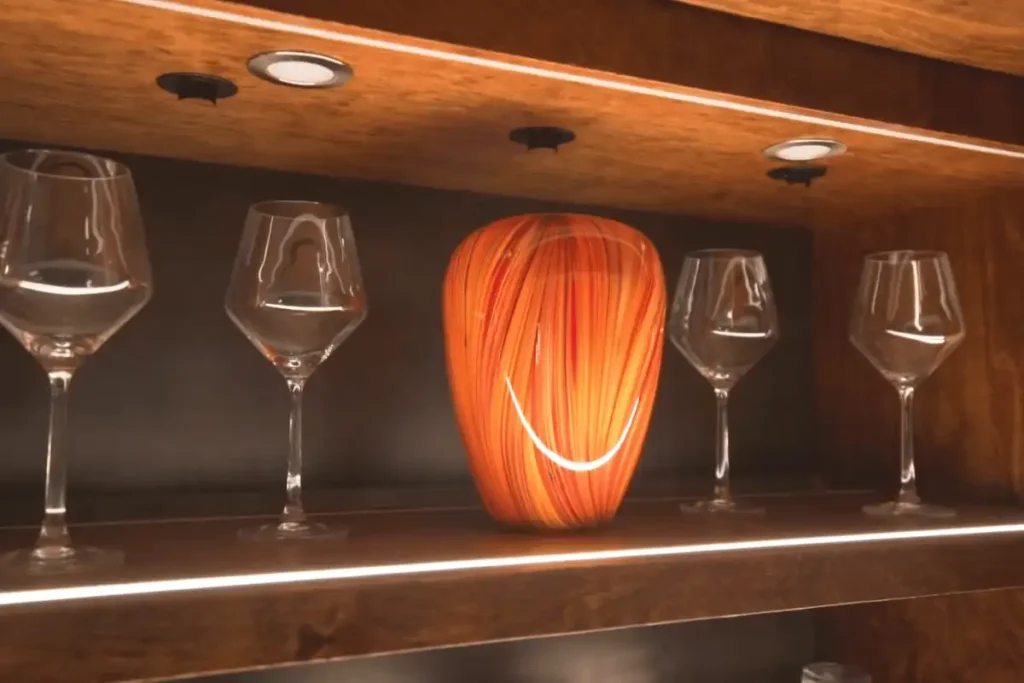
3. Accent Lighting for Galley Kitchens
Now, let’s talk about accent lighting. This is where your kitchen gets to shine—literally. Accent lights are all about adding that extra wow factor. Use them to highlight a stunning backsplash, show off open shelving, or draw attention to cool architectural details. It’s not just about lighting; it’s about creating a vibe that makes your kitchen feel like yours.
Best Accent Lighting Options:
- LED Strip Lights Inside Glass-Front Cabinets: Adds depth and a high-end look.
- Toe-Kick Lighting (Baseboard LED Strips): Creates a floating effect and improves nighttime visibility.
- Cove Lighting: Installed in crown molding, it softly uplifts the ceiling, making the space feel taller.
Placement Tip:
For accent lighting, warm LED strips are your go-to. They’re like the cozy blanket of lighting—soft, inviting, and just the right amount of glow. They add charm without blasting your kitchen with harsh brightness. Perfect for those evenings when you want your kitchen to feel warm and welcoming, not like a sterile lab.
Choosing the Right Bulbs and Color Temperature for Galley Kitchens
Now, let’s talk about bulbs. Picking the right ones is just as important as choosing the fixtures. It’s not just about how bright they are (that’s lumens, by the way) but also how warm or cool they feel (measured in Kelvin). Get this combo right, and your galley kitchen will feel like the heart of your home—bright enough to work in, but warm enough to linger in.
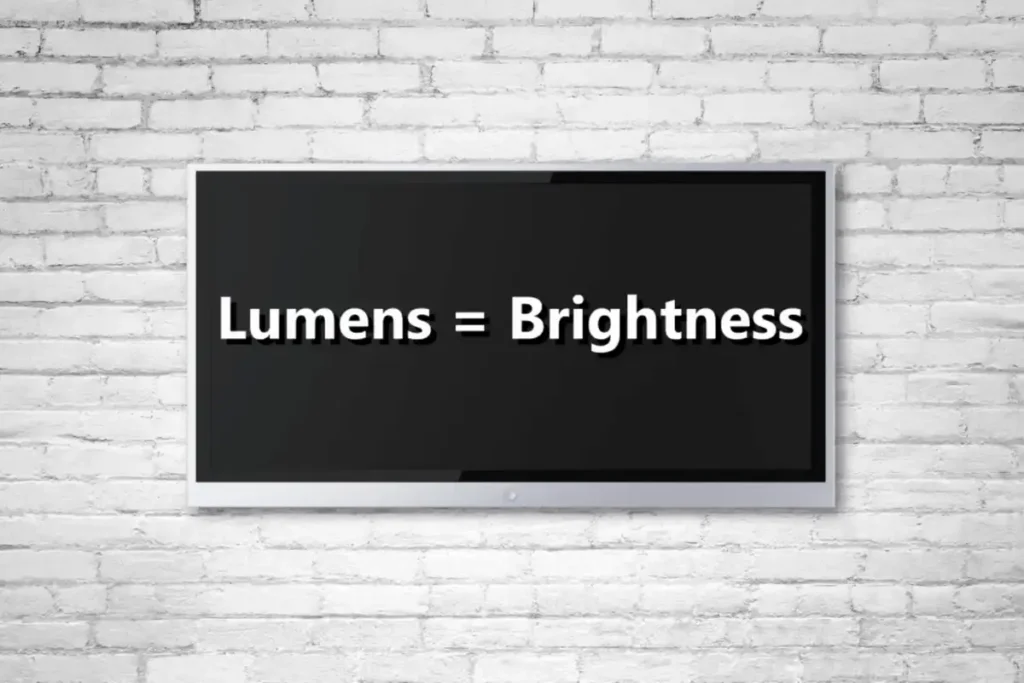
1. Understanding Lumens: How Bright Should Your Galley Kitchens Be?
Speaking of brightness, lumens are the magic number here. Different spots in your kitchen need different levels of light. Prep areas? Go bright. Dining nook? Keep it mellow. It’s all about balance—like a perfectly seasoned dish.
Recommended Lumens for Each Lighting Type:
- Ambient Lighting: 3,000 – 4,000 lumens (spread across ceiling fixtures)
- Task Lighting: 4,000 – 8,000 lumens (focused on work areas)
- Accent Lighting: 1,000 – 2,000 lumens (subtle highlights)
To achieve proper brightness, combine multiple light sources rather than relying on a single fixture.
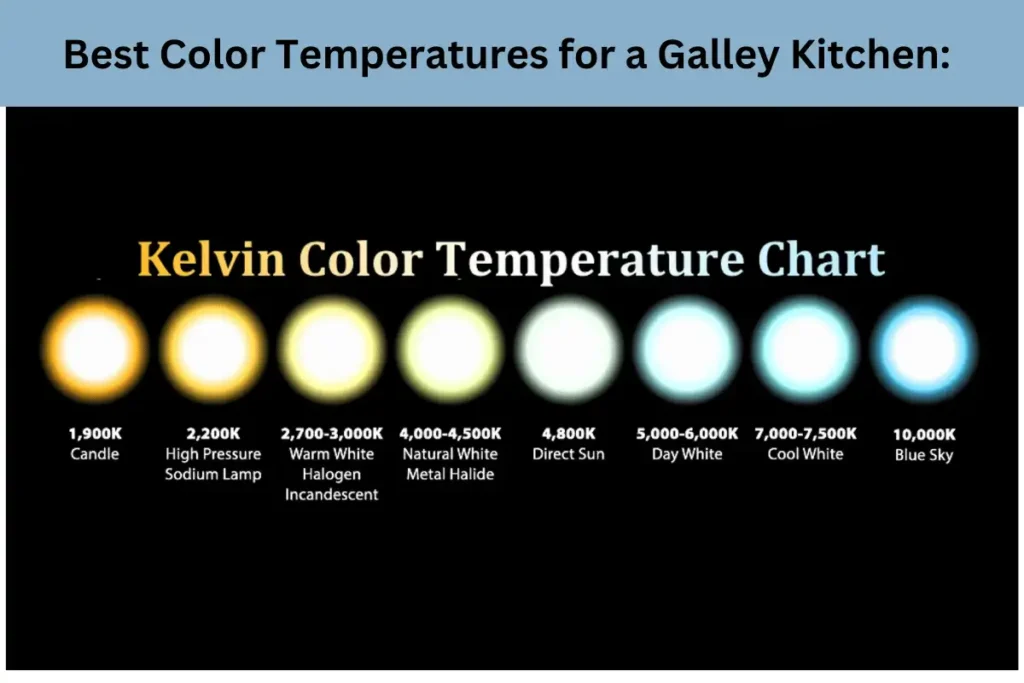
2. Choosing the Right Color Temperature (Kelvin Scale)
Ever heard of the Kelvin scale? It’s not just a science term—it’s the secret sauce behind how your kitchen feels. This scale measures the color temperature of light, and it’s a game-changer for setting the mood and functionality of your galley kitchen. Warm light feels cozy and inviting, while cooler light keeps things crisp and focused.
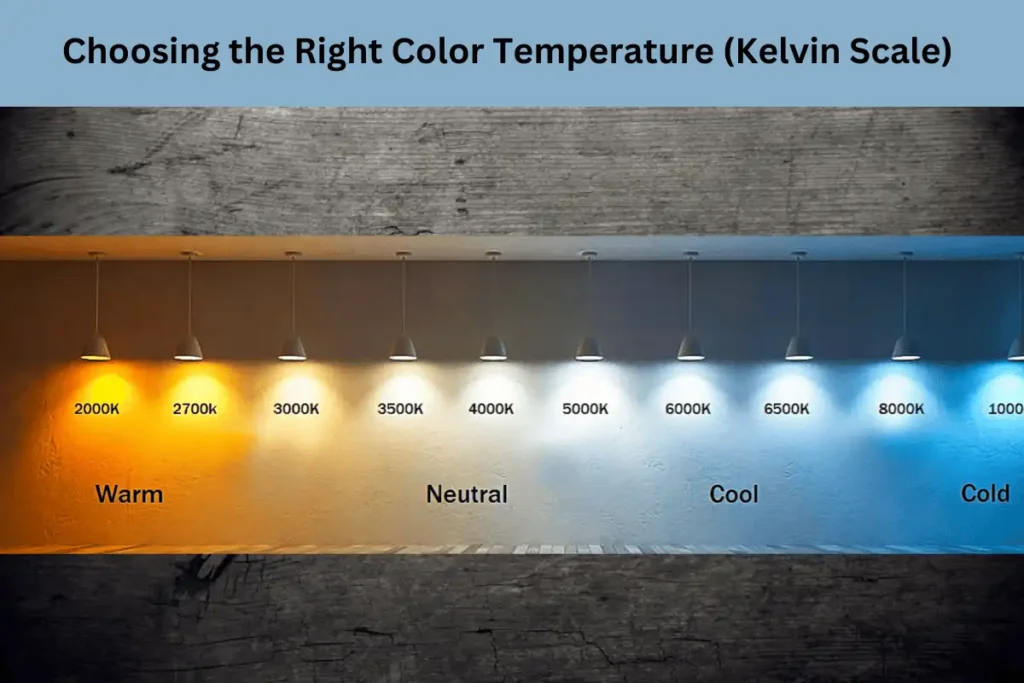
Best Color Temperatures for a Galley Kitchen:
- Warm White (2700K – 3000K): Creates a cozy and inviting atmosphere, ideal for accent lighting.
- Neutral White (3500K – 4000K): A balanced, natural tone that enhances visibility without being too harsh—best for ambient lighting.
- Cool White/Daylight (4500K – 5000K): Bright and crisp, making it perfect for task lighting over countertops and prep areas.
Pro Tip: Mix and match! Use neutral white for your general lighting—it’s like the Goldilocks of light, not too warm, not too cool. Then, go for cool white in your task areas. It’s bright, sharp, and perfect for when you’re chopping, stirring, or reading those tiny recipe instructions. Together, they create a kitchen that’s both comfortable and super efficient.
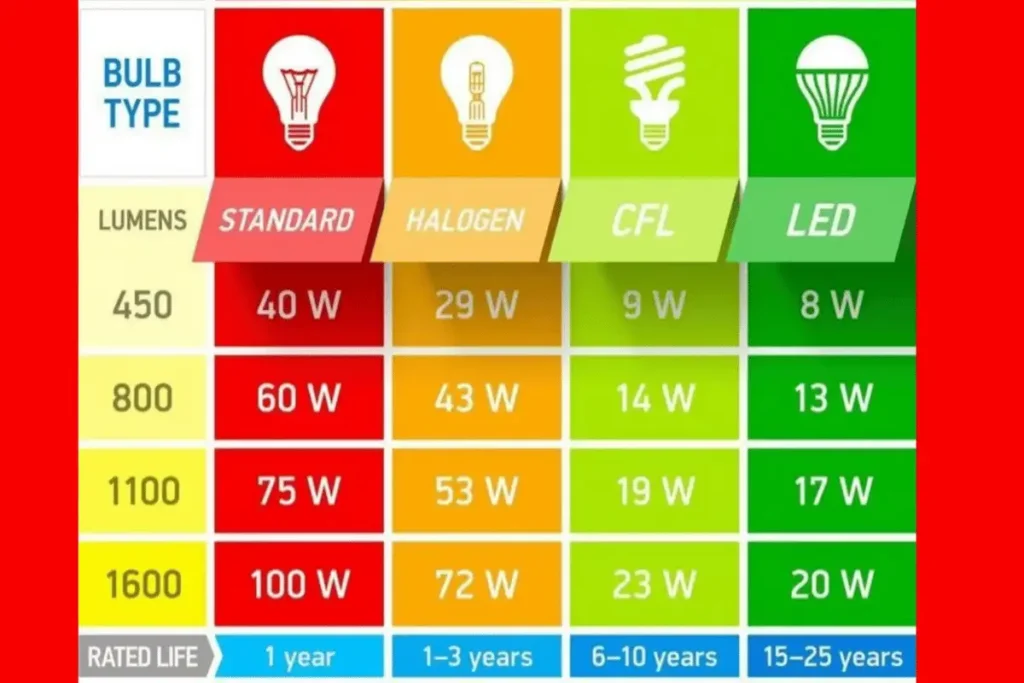
3. LED vs. Incandescent vs. CFL: Which Bulb Type is Best lighting for galley kitchen
Modern kitchens benefit from energy-efficient LED bulbs, but understanding the differences can help you make the best choice.
| Bulb Type | Pros | Cons |
| LED (Light Emitting Diode) | Energy-efficient, long lifespan, bright and clear light | Higher initial cost (but saves money long-term) |
| CFL (Compact Fluorescent Lamp) | Affordable, energy-saving | Slower warm-up time, contains mercury |
| Incandescent | Warm, natural glow | Short lifespan, high energy use |
Best Choice: LED bulbs are the most efficient, durable, and versatile option for galley kitchens.
LED vs. Halogen vs. Fluorescent: Which is Best lighting for galley kitchen?
Not all bulbs are created equal. Here’s how they compare:
| Bulb Type | Pros | Cons |
| LED | Energy-efficient, long lifespan (25,000+ hours), dimmable options | Higher upfront cost, but saves money long-term |
| Halogen | Bright, warm light, dimmable | Short lifespan, gets hot, uses more energy |
| Fluorescent | Affordable, energy-efficient | Harsh lighting, may flicker over time |
💡 Tip: LED bulbs are the best choice for galley kitchens—they provide bright, energy-efficient lighting with minimal heat output.
How to Layer Lighting for Galley Kitchen
Let’s be real—lighting a galley kitchen isn’t as simple as flipping a switch and hoping for the best. It’s about layering light in a way that makes your space feel bigger, brighter, and more functional. And trust me, when you get it right, it changes everything.
There are three main types of lighting you need to focus on: ambient, task, and accent. Each one plays a different role, and when you combine them, your kitchen goes from dim and cramped to warm, inviting, and super efficient.
1. Setting the Stage with Ambient Lighting for galley kitchen
Think of ambient lighting as your kitchen’s foundation—it’s the soft, overall glow that makes the space feel open and welcoming. In a galley kitchen, where shadows can make things feel even tighter, you need even, well-distributed light that reaches every corner.
Best Ambient Lighting Options:
✔ Flush or Semi-Flush Mount Ceiling Lights: Great for lower ceilings, these provide widespread illumination without taking up extra space.
✔ Recessed Ceiling Lights: A sleek, modern option that keeps lighting subtle but effective. Space them about 4-6 feet apart to prevent dark spots.
✔ Track Lighting: If your kitchen has uneven lighting, adjustable track heads let you point light exactly where you need it.
💡 Personal Tip: I always recommend using neutral white LED bulbs (3500K-4000K) for ambient lighting—it’s bright enough to make the space feel airy but not so harsh that it feels sterile.
2. Task Lighting for galley kitchen
If you’ve ever struggled to chop veggies under dim lighting, you know how important good task lighting is. This type of lighting focuses on key work areas like countertops, the stove, and the sink—making meal prep safer and much more enjoyable.
Best Task Lighting Solutions:
✔ Under-Cabinet Lighting: Perfect for lighting up your prep area. LED strips or puck lights give a seamless, modern look.
✔ Pendant Lights Over Counters: If you have an extended counter or breakfast bar, pendant lights add both function and style.
✔ Directional Track or Spotlights: Overhead lighting can sometimes cast shadows where you need light the most. Adjustable spotlights help target those areas.
💡 Personal Tip: Go for cool white LED bulbs (4000K-5000K) for task lighting. They create crisp, shadow-free light that makes chopping and cooking much easier.
3. Accent Lighting Lighting for galley kitchen
Accent lighting isn’t necessarily essential, but if you want your galley kitchen to feel a little more high-end (without a full renovation), it makes a huge difference. It adds warmth, depth, and a polished touch that takes your space to the next level.
Best Accent Lighting Ideas:
✔ Toe-Kick Lighting: Installing LED strip lights under cabinets gives a soft glow along the floor—great for nighttime visibility and a stylish touch.
✔ Above-Cabinet Lighting: If you have extra space above your cabinets, adding soft, indirect lighting creates an illusion of height and openness.
✔ Glass Cabinet Lighting: Got glass-front cabinets? LED puck lights inside them make your dishes and decor pop.
💡 Personal Tip: Stick with warm white bulbs (2700K-3000K) for accent lighting—it gives off that cozy, inviting glow that makes a kitchen feel like home.
My Personal Guide to Choosing the Perfect Lighting for galley kitchen
Let’s be real—lighting a galley kitchen is tricky. You don’t have a ton of space to work with, and the wrong fixtures can make it feel even more cramped. But don’t worry—I’ve got you covered! I’ve spent a lot of time experimenting with different lighting setups, and I’m here to share what actually works.
The key? Layered lighting that’s both practical and stylish. Let’s break it down together.
1. Ceiling-Mounted Lighting for galley kitchen
The first thing you need is solid ambient lighting—your main light source. Since most galley kitchens don’t get much natural light, this is where you want to make a smart choice.
Here’s what works best:
- Flush Mount Fixtures – If your ceiling is under 8 feet, go for these. They spread light evenly without making the space feel cluttered.
- Semi-Flush Mount Fixtures – Have a little more ceiling height? These sit a bit lower, giving off a softer, more even glow.
- Recessed Can Lights – Want a sleek, modern look? Install these every 4-6 feet to prevent dark spots.
💡 My Tip: If you’re using recessed lights and have an insulated ceiling, make sure to get an IC-rated fixture for safety.
2. Pendant Lighting for galley kitchen
I love pendant lights in galley kitchens! They add character and extra task lighting, especially over an extended counter or breakfast bar.
Best styles?
- Mini Pendants – Small, sleek, and perfect for narrow countertops.
- Multi-Light Pendants – A single fixture with multiple hanging lights = even distribution!
- Glass or Open-Frame Pendants – These help keep your kitchen feeling open and airy.
💡 Pro Tip: Hang pendants 30-36 inches above the counter for the best lighting balance.
3. Under-Cabinet Lighting for galley kitchen
Ever find yourself squinting while chopping veggies? Under-cabinet lighting is a game-changer! It eliminates shadows and makes prep work easier.
Top picks:
- LED Strip Lights – Super easy to install and provide continuous lighting along the entire counter.
- Puck Lights – Great for spotlighting specific areas, like a coffee station or cutting board zone.
- Hardwired vs. Battery-Powered – Hardwired gives you steady brightness, but battery-powered is perfect for a quick upgrade.
💡 Try This: Motion-activated under-cabinet lighting = hands-free convenience!
4. Track Lighting for galley kitchen
If you’re dealing with awkward dark spots, track lighting for galley kitchens can be a lifesaver. The adjustable heads let you direct light exactly where you need it.
Why it works for galley kitchens:
✔ You can point lights at the sink, stove, or prep area.
✔ It’s mounted on the ceiling, so it doesn’t clutter up your workspace.
✔ It looks modern and stylish, with sleek designs that fit contemporary kitchens.
💡 Personal Favorite: A linear track system works best for long, narrow spaces like galley kitchens!
5. Toe-Kick & Cove Lighting: That Extra Touch of Luxury
Want to take your lighting game to the next level? Toe-kick and cove lighting add subtle elegance while making your space feel bigger.
How to use them:
- Toe-Kick Lighting – Soft LED strips under lower cabinets create a beautiful glow along the floor.
- Cove Lighting – Install above cabinets to make your ceiling look higher and the space feel more open.
💡 Bonus Tip: Use smart LED strips with dimming and color adjustment for a fully customizable vibe!
How to Bring More Natural Light Into a Galley Kitchen
about natural Lighting for galley kitchen, Let’s be honest—galley kitchens are practical. But they can also feel a bit narrow and enclosed, especially if they don’t get much natural light. The good news? Even if your kitchen doesn’t have huge windows, you can still brighten things up with a few clever design choices.
If you’re tired of feeling like you’re cooking in a dim hallway, here are some practical ways to maximize daylight and make your space feel bigger and airier.
1. Light Colors & Reflective Finishes Are Your Best Friends
Color can do wonders when it comes to brightening up a space. Darker shades tend to absorb light, while lighter hues reflect it—so your color choices matter more than you think.
🎨 Best Ways to Use Color & Finish:
✔ Walls & Cabinets: Stick to white, light gray, or pastel shades to make the space feel more open.
✔ Backsplashes: A glossy, mirrored, or glass tile backsplash will bounce light around the room beautifully.
✔ Countertops & Flooring: Choose light-colored quartz, marble, or polished tile to enhance brightness.
💡 Pro Tip: Avoid flat matte finishes—they absorb light instead of reflecting it. A semi-gloss or high-gloss finish will help bounce sunlight around the room.
2. Window Treatments: Let the Light In!
Your windows might be small, but that doesn’t mean they can’t make a big impact. The wrong coverings can block precious daylight, so you want to be strategic about what you use.
🌞 Best Window Treatment Choices:
✔ Sheer Curtains – They soften harsh sunlight without blocking it completely.
✔ Lightweight Blinds – White or neutral-toned blinds let you control light flow without darkening the space.
✔ Frosted Glass Film – Great if you want privacy but still need daylight to shine through.
🚫 What to Avoid? Heavy, dark-colored drapes—they absorb light and can make your kitchen feel even smaller.
3. Use Glass & Open Shelving to Keep Things Airy
If your kitchen feels closed off, incorporating glass elements is a simple trick that can help distribute light more effectively. Even a few tweaks can make a noticeable difference.
🔹 Easy Glass & Open Design Upgrades:
✔ Glass Cabinet Doors – They make your kitchen feel less heavy while reflecting more light.
✔ Mirrors or Mirrored Panels – Placing a mirror opposite a window is a genius hack to double daylight.
✔ Open Shelving – Less visual clutter = a more open, spacious feel.
💡 Quick Fix: If possible, swap solid interior doors for frosted glass doors—it’s a subtle way to allow more light into the space.
4. Skylights & Solar Tubes: Let There Be (More) Light
If your galley kitchen lacks windows, don’t worry—there are still ways to bring in natural light from above. If your home’s structure allows, skylights or solar tubes can make a massive difference.
☀️ Smart Solutions for Extra Daylight:
✔ Skylights: If your kitchen is on the top floor, a skylight can provide direct natural light from above.
✔ Solar Tubes: These are a cheaper alternative to skylights, using a reflective tube to bring in sunlight.
💡 Bonus Tip: Can’t install a skylight? Try transom windows above doorways—they let light pass through different rooms!
Smart for Ideas to Make Your Galley Kitchen More Functional
If you’ve ever struggled with dim lighting while chopping veggies or wished your kitchen lights could just know when you need them, you’re not alone. I’ve been there too. The good news? Smart lighting can completely change how your galley kitchen feels and functions—without requiring a major renovation.
I’ve worked with homeowners who’ve transformed their kitchens with just a few smart lighting tweaks, and let me tell you, the difference is night and day (literally!). Whether you want hands-free convenience, energy savings, or the perfect lighting for late-night snacking, there’s an easy solution.
Let’s go over some simple, practical ways you can bring smart lighting into your kitchen.
1. Upgrade to Smart Bulbs for Instant Control
If you’re not ready to swap out your fixtures, smart bulbs are the easiest way to step into the world of smart lighting. Just screw them in, connect them to your WiFi, and you’re good to go.
✅ Voice Control – Just say, “Alexa, turn on the kitchen lights,” and boom—they’re on. Works with Google Assistant and Apple HomeKit too.
✅ Adjustable Brightness & Color – Switch between cool, bright light for cooking and warm, cozy light for dinner. You can even go with fun colors if that’s your vibe.
✅ Scheduling & Automation – Set your lights to brighten up in the morning or dim down in the evening—so your kitchen is always lit just the way you like it.
💡 Pro tip: If you don’t want the hassle of an extra hub, go for WiFi-enabled bulbs that connect directly to your phone.
2. Motion-Sensor & Touchless Lighting for galley kitchen
Picture this: You walk into the kitchen with your hands full of groceries, and—voila!—the lights turn on automatically. That’s the magic of motion-activated lighting.
✅ Under-Cabinet Motion Lights – Perfect for when you’re prepping meals late at night. No more fumbling for switches!
✅ Toe-Kick Sensor Lights – A game changer if you make frequent midnight snack runs. These soft floor lights guide your way without blasting your eyes.
✅ Touchless Faucet Lighting – Some smart faucets even have built-in LED lighting that turns on when the water runs. It’s a small touch, but it makes a difference.
💡 Pro tip: Motion-sensor lights are great for energy savings since they turn off when you’re not using them.
3. Smart Switches & Dimmers Give You Total Control
If you prefer keeping your existing light fixtures but want more control, smart switches and dimmers are the way to go. These let you adjust lighting with an app or voice command—so no more flipping switches when your hands are messy from cooking.
✅ Control Everything from Your Phone – Whether you’re in bed or on vacation, you can turn lights on or off remotely.
✅ Set the Mood with Scenes – Create lighting presets for cooking, eating, or entertaining.
✅ Sync with Other Smart Devices – Link your lights to security systems or voice assistants for a seamless smart home setup.
💡 Pro tip: If you like dim lighting at night, opt for dimmable smart switches that let you fine-tune brightness levels.
4. Adjust the Ambiance with Tunable White Lighting
Lighting isn’t just about brightness—it’s about feeling. That’s where tunable white lighting comes in. It lets you change the warmth of your lights throughout the day.
✅ Cool White (4000K-5000K) – Bright, crisp light that’s perfect for cooking.
✅ Warm White (2700K-3000K) – A softer glow that makes dinner feel more inviting.
✅ Circadian Rhythm Lighting – Mimics natural daylight patterns, so your kitchen lighting shifts automatically as the day goes on.
💡 Pro tip: Smart LED strips with tunable white light are amazing under cabinets for a layered lighting effect.
5. Hands-Free Control with Voice & App Integration
Imagine this: Your hands are covered in flour while baking, and instead of stopping to wash up just to adjust the lights, you simply say—
“Hey Google, turn on the kitchen lights.”
Or maybe you’re already snuggled up on the couch when you realize you left the lights on—just grab your phone and turn them off remotely.
✅ Works with Alexa, Google Assistant, and Apple HomeKit – Hands-free control at its best.
✅ Control from Anywhere – Whether you’re at home or away, an app lets you adjust everything with a tap.
✅ Sync with a Smart Hub – If you already have a smart home setup with Amazon Echo or Google Nest, integrating your lights makes things even smoother.
💡 Pro tip: A smart home hub can link multiple smart devices together, so you can control lights, music, and security all in one place.
Energy-Efficient Lighting for galley kitchen
If you’ve ever felt like your galley kitchen could use better lighting—but without skyrocketing your electricity bill—you’re not alone. I’ve been there! The good news? You don’t have to sacrifice brightness or style to keep your energy costs in check. You just need the right lighting choices, and I’ve got you covered.
Let’s talk about the best energy-efficient lighting options that will keep your kitchen well-lit, cozy, and cost-effective.
1. LED Bulbs: My Go-To for Maximum Efficiency
If you take one thing away from this, let it be this—LEDs are the best investment for your kitchen lighting. They use up to 80% less energy than those old-school incandescent bulbs and last forever (okay, maybe not forever, but close).
✅ Long-Lasting: Most LEDs keep shining for 25,000-50,000 hours—compared to just 1,000 hours with traditional bulbs.
✅ Low Heat Output: No more turning your kitchen into a mini sauna while cooking.
✅ Dimmable Options: Adjustable brightness for the perfect mood lighting.
💡 Pro Tip: Always look for Energy Star-certified LEDs—they’re the real deal when it comes to efficiency and performance.
2. CFLs: A Budget-Friendly Alternative
Compact Fluorescent Lights (CFLs) aren’t as popular as LEDs these days, but if you’re looking for a low-cost option, they’re still worth considering.
✅ Uses 70% less energy than incandescent bulbs.
✅ Lasts up to 10,000 hours, so you won’t be replacing them too often.
✅ Soft, even lighting—great if you prefer a warmer glow.
💡 Pro Tip: Stick with warm white or daylight color temperatures to avoid that harsh, office-like lighting in your kitchen.
3. Solar-Powered Lighting for galley kitchen
Okay, this one might not be for everyone, but if you want a truly energy-efficient setup, solar-powered LED lights are a creative solution—especially for accent lighting.
✅ Great for under-cabinet Lighting for galley kitchen
✅ Completely free to run once installed (nature takes care of the power bill).
✅ Works well for outdoor kitchens or near windows where they can soak up sunlight.
💡 Pro Tip: Try solar-powered motion lights near your pantry or entryway for a hands-free, no-waste lighting option.
4. Low-Voltage Lighting for galley kitchen
Low-voltage lighting (12V or 24V) is a smart way to save energy while keeping your kitchen bright. It’s especially great for task lighting—like under cabinets or along the floor for a subtle glow.
✅ Safer for homes with kids or pets since it operates at a lower voltage.
✅ Perfect for layered lighting—combine it with other lights for a well-lit space.
✅ Reduces power consumption without sacrificing style.
💡 Pro Tip: Install low-voltage LED strips under cabinets for that sleek, modern look.
5. Smart Lighting for galley kitchen
If you really want to take energy efficiency to the next level, smart lighting is the way to go. Today’s lighting tech can actually help cut down on wasted energy without you lifting a finger.
✅ Occupancy Sensors: Lights turn off automatically when you leave the room.
✅ Daylight Sensors: Adjust brightness based on the natural light available.
✅ Smart Timers: Set your lights to shut off after a certain amount of time.
💡 Pro Tip: Pair smart dimmers with LED bulbs—you could cut energy usage by up to 30% just by adjusting the brightness when you don’t need full power.
Wrapping It Up: My Best Lighting Recommendations
So, what’s the best choice for your galley kitchen? Here’s my quick take:
✔ LEDs are hands-down the best for long-term savings and brightness.
✔ CFLs can work if you need a more affordable option, but LEDs will outlast them.
✔ Solar-powered lights are a fun and practical addition if you want to go green.
✔ Low-voltage lighting is great for accents and keeping things energy-efficient.
✔ Smart lighting features make life easier and help cut down on waste.
No matter which route you take, choosing energy-efficient lighting means lower bills and a brighter, more inviting kitchen. And honestly, who doesn’t want that?
How to Install Galley Kitchen Lighting Like a Pro
Lighting can make or break a kitchen, and in a galley-style setup, it’s even more important to get it just right. I’ve worked on plenty of small kitchen remodeling, and trust me—good lighting transforms the space from cramped and dim to bright and inviting. Whether you’re handling the installation yourself or bringing in an electrician, I’ve got you covered with some must-know tips to make the process smooth and stress-free.
1. Start with a Solid Lighting Plan
Perfect for: Avoiding uneven lighting and frustrating dark corners
Before you grab a drill or call in a pro, take a moment to plan. A well-thought-out lighting layout prevents shadows, glare, and those pesky dim spots that can make a kitchen feel smaller than it is.
💡 Placement Tips:
- Overhead lights: Space recessed lights evenly (every 4-6 feet) to ensure full coverage.
- Under-cabinet lights: Mount them near the front edge for the best task lighting.
- Pendant lights: Hang them about 30-36 inches above the counter—low enough to be useful but not in the way.
👉 Pro Tip: Not sure if your placement is right? Use painter’s tape to mark where fixtures will go before making anything permanent. It’s a quick, no-risk way to visualize your layout!
2. Wiring & Electrical Basics
Perfect for: Keeping everything safe and up to code
If you’re comfortable with electrical work, you might be able to handle some of this yourself. But if running new wiring is involved, I always recommend bringing in a licensed electrician—it’s worth it for the peace of mind.
🔌 Key Wiring Tips:
- Stick with 12- or 14-gauge wire for most kitchen lighting circuits.
- Keep lights on a dedicated circuit to avoid overloading your system.
- Always, always turn off power at the breaker before working with any wiring.
👉 Quick Advice: Adding dimmers is a game-changer. You’ll save energy and be able to set the perfect mood for any time of day.
3. Installing Recessed Lighting for galley kitchen
Perfect for: A sleek, modern look with even illumination
If recessed lighting is part of your plan, follow these steps to make sure everything looks great and works flawlessly.
🛠 Step-by-Step:
- Use a template to cut clean, precise holes in the ceiling.
- Run wiring between each light location.
- Connect wires properly—black to black, white to white, ground to ground.
- Secure the fixture in place and attach trim.
- Install LED bulbs, turn the power back on, and test!
👉 Helpful Hint: Space recessed lights every 4-6 feet for the best balance of brightness and warmth. Too close together, and it’s overkill. Too far apart, and you’ll get unwanted shadows.
4. Mounting Under-Cabinet Lights
Perfect for: Eliminating counter shadows and making meal prep easier
Under-cabinet lighting is one of my favorite upgrades—it instantly makes a kitchen feel high-end, and installation is pretty straightforward.
🛠 How to Install:
- Decide if you’ll use adhesive strips or screws—some lights are peel-and-stick, while others need mounting hardware.
- Position the fixture near the front edge of the cabinet for the best lighting effect.
- Secure the light and connect the wiring (or just plug it in).
- Turn it on, check the brightness, and adjust if needed.
👉 Pro Tip: If hardwiring, connect under-cabinet lights to the same switch as your overhead lights. That way, everything turns on together—no extra switches to fumble with!
5. Hanging Pendant Lights
Perfect for: Adding personality and warmth to your kitchen
Pendant lights aren’t just practical—they’re a stylish way to make your galley kitchen feel less boxy and more open.
🛠 What to Know Before Installing:
- Hang them 30-36 inches above the counter so they provide light without getting in the way.
- Keep pendants 24-30 inches apart—too close, and they feel crowded; too far apart, and the lighting won’t be even.
- If your ceiling height varies, go for adjustable pendants so you can tweak them as needed.
👉 Styling Advice: Keep pendant lights symmetrical, especially over an island or breakfast bar. Uneven placement can make the whole space feel off-balance.
6. Final Checks & Adjustments
Perfect for: Making sure everything works before wrapping up the job
Once all your lighting is installed, take a moment to step back and check:
✅ Do all fixtures turn on and off as expected?
✅ Are dimmers working properly?
✅ Is there any flickering or buzzing? (If so, double-check the wiring.)
✅ Are shadows minimized, and is the space evenly lit?
If something feels off, don’t hesitate to adjust! Small tweaks—like slightly shifting a fixture or swapping a bulb—can make a huge difference in how your kitchen looks and feels.
You may interested to Read Also this article: Modular Kitchen Design
Avoid These Common Galley Kitchen Lighting Mistakes
Lighting can make or break a kitchen, and trust me, I’ve seen it all. A well-lit galley kitchen feels open, functional, and inviting—but a few common lighting mistakes can leave it feeling dim, cramped, or just plain impractical. Let’s go over the biggest missteps I’ve come across and how to fix them.
1. Relying Only on Overhead Lighting
What Goes Wrong: Depending on a single overhead fixture to light up the entire kitchen creates harsh shadows and uneven lighting. It’s frustrating when your workspace is too dim, making cooking and prep work harder than it needs to be.
What to Do Instead:
- Layer your lighting! Under-cabinet lights, task lighting, and accent lights work together to create a bright, balanced space.
- Track lights or recessed lighting can help distribute brightness evenly across your kitchen.
- Consider pendant lights above counters—not just for aesthetics but for better visibility.
2. Picking the Wrong Light Color Temperature
What Goes Wrong: Lighting that’s too warm or too cool can completely change the way your kitchen looks—and not in a good way. Ever noticed how food can look unappetizing under certain lighting? That’s what we’re avoiding here.
What to Do Instead:
- Stick with bulbs in the 3000K–4000K range (soft white to bright white) for a balanced, inviting glow.
- Avoid overly yellow (2700K) or harsh blue-white (5000K+) bulbs that can distort colors.
- If you want flexibility, go for adjustable color temperature LED bulbs.
3. Skipping Task Lighting for Counters and Stovetop
What Goes Wrong: Prep work and cooking happen on your counters and stovetop, so if these areas aren’t well-lit, you’ll struggle with visibility (and safety!).
What to Do Instead:
- Under-cabinet LED strips brighten up countertops without taking up space.
- Use recessed or track lighting aimed at the stovetop for better illumination.
- If rewiring isn’t an option, try battery-powered or motion-sensor lights for extra convenience.
4. Forgetting to Install Dimmers
What Goes Wrong: Keeping kitchen lights at full brightness all the time can feel overwhelming—not to mention waste energy.
What to Do Instead:
- Install dimmer switches so you can control the brightness based on the time of day and your needs.
- Smart bulbs or LED-compatible dimmers let you adjust lighting with a simple touch or voice command.
- Use different brightness settings for cooking, dining, or simply unwinding.
5. Sticking with Outdated or Inefficient Bulbs
What Goes Wrong: Incandescent and halogen bulbs might be nostalgic, but they waste energy, give off too much heat, and don’t last long.
What to Do Instead:
- Switch to LEDs—they use less energy, last longer, and run cooler.
- Opt for Energy Star-certified bulbs for maximum efficiency.
- Consider smart bulbs so you can adjust brightness and schedules effortlessly.
6. Poor Placement of Pendant or Ceiling Lights
What Goes Wrong: Ever been in a kitchen where the lighting is too high, too low, or just in the wrong place? That’s how you end up with glare, weird shadows, or uneven illumination.
What to Do Instead:
- Hang pendant lights 28-36 inches above countertops for optimal lighting.
- Space recessed lights about 4-6 feet apart to ensure even coverage.
- Avoid placing lights directly behind where you stand to prevent casting shadows over your workspace.
7. Ignoring Natural Light
What Goes Wrong: Relying only on artificial lighting makes your kitchen feel closed off and dark, especially during the day.
What to Do Instead:
- Use light, reflective surfaces like backsplashes, countertops, and cabinets to bounce natural light around the room.
- Opt for sheer curtains or blinds that let in daylight without adding glare.
- Consider mirrors or glass cabinet doors to help spread light throughout the space.
Final Touches and My Best Tips for Galley Kitchen Lighting
Alright, we’ve talked about smart lighting, but before we wrap things up, I want to share some final touches and little tricks I’ve picked up that can make a world of difference in your galley kitchen. These are the kinds of details that take your lighting from good to absolutely perfect.
1. Layering Light the Right Way
A galley kitchen isn’t just about slapping up a few lights and calling it a day. If you want it to feel bright, open, and functional, you’ve got to layer your lighting. Trust me, this one’s a game-changer.
🔹 Task Lighting – The must-have for work areas like countertops, the sink, and the stove.
🔹 Ambient Lighting – This is your general lighting that ensures the whole kitchen is evenly lit.
🔹 Accent Lighting – The “wow” factor! It highlights design elements and adds depth to the space.
💡 My Tip: Mix and match! I like to use LED recessed lights for overall brightness, under-cabinet lighting to make meal prep easier, and stylish pendant lights to bring some personality into the space.
2. Picking the Right Light Bulbs (Because It Matters!)
Not all light bulbs are created equal, and trust me, choosing the right ones makes a huge difference in how your kitchen looks and feels.
My go-to options:
✅ LED bulbs – They last forever and save energy (win-win!).
✅ Dimmable bulbs – Because sometimes you need bright light for cooking and softer light for a cozy evening.
✅ Adjustable color temperature – Helps shift between warm and cool tones depending on the mood you’re going for.
Best Color Temperatures for Different Lighting Needs:
🔸 Task Lighting: 4000K – 5000K (Cool white for a crisp, clear view)
🔸 General Lighting: 3000K – 4000K (Warm white to neutral for a welcoming feel)
🔸 Accent Lighting: 2700K – 3000K (Soft white for a cozy vibe)
💡 My Tip: Always look for bulbs with a CRI of 80+ to make sure your food, countertops, and cabinets look their best under the light.
3. Making the Most of Natural Light
Galley kitchens can sometimes feel a little enclosed, but if you’ve got even a sliver of natural light, use it to your advantage!
🔹 Go for reflective surfaces – Glossy tiles, stainless steel appliances, and glass backsplashes help bounce light around.
🔹 Sheer window treatments – If you’re lucky enough to have a window, opt for light-filtering shades instead of heavy curtains.
🔹 A light-colored backsplash – Whites, creams, and pastels naturally brighten things up.
🔹 Mirrors work wonders – A small mirror or mirrored panels can make a big impact by reflecting whatever natural light you have.
💡 My Tip: If your kitchen doesn’t get much daylight, no worries! You can fake it with 4000K LED lighting, which gives off a bright, natural feel.
4. How to Keep Lighting Energy-Efficient
Want to keep your electric bill low and have great lighting? It’s totally doable.
✅ Switch to LED bulbs – They use 75% less energy than old-school incandescent bulbs.
✅ Install dimmers – Adjusting brightness saves energy and makes bulbs last longer.
✅ Use motion sensors or timers – No more lights left on when no one’s in the kitchen.
✅ Pick ENERGY STAR-rated fixtures – These meet high-efficiency standards and save money in the long run.
💡 My Tip: For the perfect mix of brightness and efficiency, aim for LED fixtures with a lumens output of 700-1200 per fixture.
5. Budget-Friendly Lighting Upgrades That Actually Work
Not looking to spend a fortune on a full lighting overhaul? No problem—I’ve got some wallet-friendly fixes that still make a big impact.
💰 Stick-on LED strips – Perfect for under cabinets or inside drawers for an instant glow-up.
💰 Battery-powered puck lights – A quick, no-install way to brighten dark corners.
💰 Swap out old bulbs – Just upgrading to brighter, energy-efficient LEDs can make a huge difference.
💰 DIY pendant light refresh – Sometimes all you need is a new shade or a fresh coat of spray paint on an old fixture.
💰 Plug-in under-cabinet lighting – No electrician needed, and it makes a big impact.
💡 My Tip: Even small tweaks—like repositioning your lights or adding just one decorative pendant—can completely change the vibe of your kitchen without draining your budget.
Find More interesting posts about remodeling, renovation and desing at the Home advice.
Author Disclaimer:
Hi, I’m Kenzie Pike, a Lighting Designer at the home advice with a passion for creating impactful lighting solutions. As the editor and author for lighting and color temperature-related content on The Home Advice, I aim to provide practical, innovative advice. Please note, this content is for general guidance only—consult a professional for personalized solutions. For inquiries, visit our contact us page.